All Stories

Thursday, December 31, 2020

When you upload a template, sometimes you can see posted dates of blog posts showing as "undefined". This is not a error in the template. To fix this problem you need to change "Timestamp Format" of your blog.

Posted Date Undefined Error in Blogger

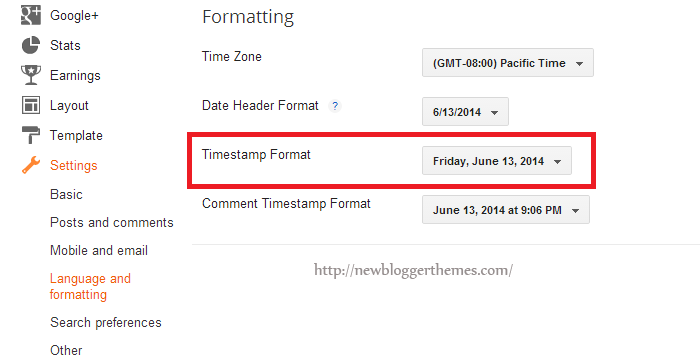
First go to your blog "Settings" --> "Language and formatting".

Select "Timestamp Format" from drop-down menu similar to "Friday, June 13, 2014" format.

Important: You need to change "Timestamp Format". Not "Comment Timestamp Format".

Timestamp Format in Blogger

Click on "Save settings" button and you are done.

How to Fix Posted Date Undefined Error in Blogger

When you upload a template, sometimes you can see posted dates of blog posts showing as "undefined". This is not a error in the template. To fix this problem you need to change "Timestamp Format" of your blog.

Posted Date Undefined Error in Blogger

First go to your blog "Settings" --> "Language and formatting".

Select "Timestamp Format" from drop-down menu similar to "Friday, June 13, 2014" format.

Important: You need to change "Timestamp Format". Not "Comment Timestamp Format".

Timestamp Format in Blogger

Click on "Save settings" button and you are done.

Posted at December 31, 2020 |  by Online Ustaad

Sunday, December 27, 2020

Image

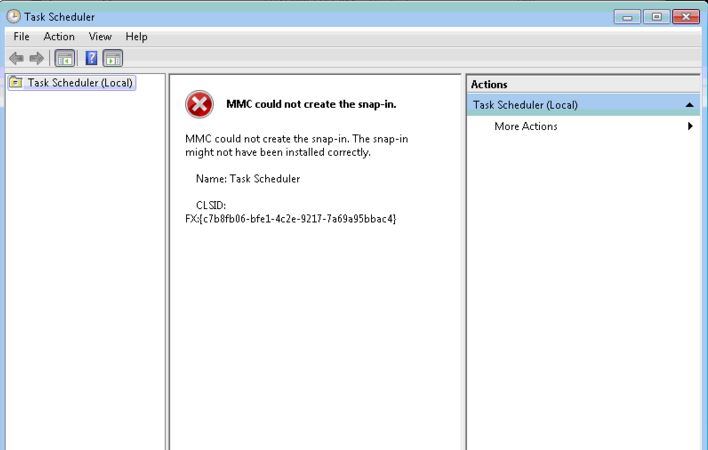
Microsoft Management Console (MMC) is a built-in feature in Windows operating system that lets you manage snap-in on the go. Snap-ins are basic component of a console. Sometimes, snap-ins may not work properly, especially if the registry configuration of a snap-in is broken. If you're going to look on the error message, you'll notice the CLSID:FX:{c7b8fb06-bfe1-4c2e-9217-7a69a95bbac4} which can help us investigate and isolate the issue. That said, you may need to modify the Windows registry.

Disclaimer: Serious problems might occur if you modify the registry incorrectly by using Registry editor or by using another method. These problems might require that you reinstall the operating system, and Microsoft cannot guarantee that it can be solved. Modify the registry at your own risk.

If you want to proceed, follow these steps to troubleshoot your the issue with MMC.

Press the Windows key + R on your keyboard, then type in regedit.

In the left pane, navigate to this location: "HKEY_LOCAL_MACHINE\SOFTWARE\Microsoft\MMC\SnapIns\FX:{c7b8fb06-bfe1-4c2e-9217-7a69a95bbac4}"

Right-click on the folder, then click Export. (This will let you backup the registry key into .reg file)

Right-click onto it again, then click Delete.

Click Yes when the confirmation box appears.

Close the Windows Registry, and restart your computer.

After restarting your computer, Windows should automatically generate the required registry configuration for the Task Scheduler and solves the problem.


How to fix MMC could not create the snap-in while opening task scheduler?

Image

Microsoft Management Console (MMC) is a built-in feature in Windows operating system that lets you manage snap-in on the go. Snap-ins are basic component of a console. Sometimes, snap-ins may not work properly, especially if the registry configuration of a snap-in is broken. If you're going to look on the error message, you'll notice the CLSID:FX:{c7b8fb06-bfe1-4c2e-9217-7a69a95bbac4} which can help us investigate and isolate the issue. That said, you may need to modify the Windows registry.

Disclaimer: Serious problems might occur if you modify the registry incorrectly by using Registry editor or by using another method. These problems might require that you reinstall the operating system, and Microsoft cannot guarantee that it can be solved. Modify the registry at your own risk.

If you want to proceed, follow these steps to troubleshoot your the issue with MMC.

Press the Windows key + R on your keyboard, then type in regedit.

In the left pane, navigate to this location: "HKEY_LOCAL_MACHINE\SOFTWARE\Microsoft\MMC\SnapIns\FX:{c7b8fb06-bfe1-4c2e-9217-7a69a95bbac4}"

Right-click on the folder, then click Export. (This will let you backup the registry key into .reg file)

Right-click onto it again, then click Delete.

Click Yes when the confirmation box appears.

Close the Windows Registry, and restart your computer.

After restarting your computer, Windows should automatically generate the required registry configuration for the Task Scheduler and solves the problem.


Posted at December 27, 2020 |  by Online Ustaad


Step.1:

  • Make a file named fullyautodial.bat
  • Right click and select edit.
  • Put the following inside it: rasdial connection nameusername password
  • Connection name = the connection you want to auto connect
  • Username = your username for this network.
  • password = your password for this network


Step. 2:

    Complete Task Management with settings.


Thanks for Visit. 😃


How to Create a Fully Automatic dialup PPPoE Internet Connection in Windows 8/10?


Step.1:

  • Make a file named fullyautodial.bat
  • Right click and select edit.
  • Put the following inside it: rasdial connection nameusername password
  • Connection name = the connection you want to auto connect
  • Username = your username for this network.
  • password = your password for this network


Step. 2:

    Complete Task Management with settings.


Thanks for Visit. 😃


Posted at December 27, 2020 |  by Online Ustaad

Thursday, December 24, 2020

Are you wondering how to create a Blogger account? Many of us do, because Blogger is one of the most popular blogging platforms out there and it can provide us with an extraordinary, fun way to express ourselves in the online world. Not only is it Blogger a very large blogging website, but it's also full of categories that you can blog on. You have complete control over what you want to blog, and that does make Blogger an amazing platform to begin with. Yet you do have to wonder how to create a blog on Blogger! We are here to help you understand all of that and so much more as fast as possible, thanks to a detailed guide that will showcase all the necessary instructions in a very easy to read manner.

how to create blogger account

Creating a Google account

What you need to know here is that Google owns Blogger, and because of that you will need to use a Google account to sign in to this platform. You can create a Google account now and then you will be able to continue to the platform without a problem. By creating a Google Account you will be able to access a wide range of Google apps and services like Drive or Mail for example. Visit the page above and share all the necessary information in order to create the necessary Google Account. Thankfully, the process is very easy and it will take only a few minutes of your time. In case you already have a Google Account, you will need to sign on the Blogger page.

create a google account

Creating your blog

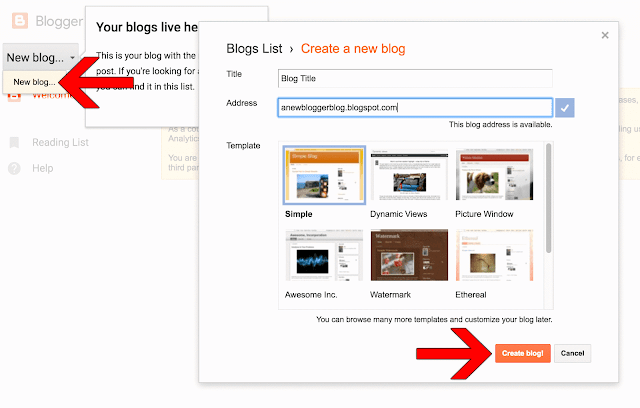
Once you are located on the Blogger page, you will need to press the New Blog button in order to start a blog. You will receive a new window where you will learn how to create a Blogger account. This will enable you to share all the necessary information.
  • Make sure that you add a title for your blog in the Title area. This is very important because it will allow you to entice the visitor to read more about you and your content. So, try to make the title relevant and appealing
  • In order for users to find your blog, you will need to create an Address for it. Your blog will have a blogspot.com address, but you will need to choose what goes before blogspot.com. Basically, you can opt for something like abcdef.blogspot.com or anything like that. Remember that this can be modified in the long run. The great thing here is that you will immediately be able to see if that address is available or not. This means you will have the ability to check the address availability really fast.
  • The next step will require you to choose from any of the presets that are available at this point. Starting with a Template is a good idea, but do remember that this can be modified afterwards as well. So it's a good idea to just pick a template and move onward.
create a blogger account

Once you have the blog title, address and template ready to go, you will have to press the Create blog! button. This process will take a little bit until it's completed properly, so just wait for a few seconds as the new blog will soon be added to the blog list. So, if you were wondering how to create a blog on Blogger, this is the simplest way to do it.

Maybe the best thing about how to create a Blogger account is that the entire process is very easy to do. Even beginners will have no problem creating and setting up an account. The customization options are plentiful here, so you shouldn't have any problem setting your account really fast!

Although the blog address will be available, you can't call that a blog unless you start writing content in there. Obviously, you will need to learn how to write a post on Blogger, and we are here to help you with that right now.

In order to start writing, you will need to click the Create a new post link or you can press the New Post button. Once you do that, you will gain immediate access to the post editor and here you can write the blog as well as make any necessary changes to content that you already wrote.

create new blogger post

Write a title for your post

Your post needs to have a title. Towards the top of the Blogger editor you will see that there is a Post title box. Add in the desired post title there. This shouldn't eat up a lot of your time, just try to come up with a post title that is enticing, very easy to use and a delight to read for your audience. A catchy title can be great. Don't opt for the clickbait title that you can see nowadays, make your title feel informative and fun to read as that's what you want. If you want to write a first post, you need to make it introductory. Write about the goals you have, the type of content you want to add and so on. It will not be easy to write down the first words, but if you create a good title it will be easier for you to translate thoughts into words!

create blogger post title

Start the writing process

You can create a Blogger post in 2 ways. You can either write the post in HTML or you can use the word processor included here. You have a button located in the top left corner which helps you switch between any of these two writing models. The HTML editor helps you create better web content and you can also use it to insert some special web functions. On the other hand, the word processor is more than qualified to offer you all the extra help you might need here.

blogger post compose html

Customizing text

If you want, you will be able to customize the text you want without a problem. You will have the ability to use the toolbar located on top of the editor to modify the text as you see fit. This includes formatting, color, size, alignment and so on. You have a Normal drop-down that helps you change the type of content you want to add, so you should consider changing between the desired heading type as you see fit. This also changes the way search engines process your content, so keep that in mind.  If possible, try to break the content into easy to read pieces. Use the Headings in a strategic manner.

blogger post heading

Add an image to your post

If you want to make your blog post enticing, you should try to add at least an image. These images make posts a lot easier to read and it's a good idea to make the most out of images if you want to share a great experience for your audience. You will have an "Insert Image" button right above your text editor, on the toolbar. There are multiple options, you can either upload them from your PC/Mac, you can share a link or you can use your webcam to take a picture if you want. However, if you link to other websites, make sure that you showcase their copyright or just refrain from doing that to begin with. There are many sites who do not agree with the idea of having their content stolen, so try to stay away from that!

insert image in Blogger post

Modify the post settings

If you look on the right side of your Post Editor, you will be able to access some Post settings. Remember that these make it easy for you to customize your post right before you choose to publish it!

blogger post settings
  • Labels are useful if you want to group multiple posts which are very similar to one another.
  • Schedule allows you to publish your content at a later date. It can come in handy if you don't want to share multiple articles at the same time.
  • Permalink is an option that allows you to select the way your post will be linked to in the future. Usually it will maintain the title structure, but there are other link types you can choose from as well.
  • Location enables you to add a location tag for your post. It's a very good tool for those that move/travel often
  • Options allows you to modify some features like the user ability to comment on a post for example. You can also choose the way your HTML code is interpreted here as well.

Previewing

A great thing about previewing your post is that you will be able to see how it looks when a reader will access it. This is the right time when you need to check your post for any errors, be it grammar or structural ones.

preview blogger post

Save the post for later

This is not the same as scheduling. When you save the post for later, it means that the post just isn't finished at this time and you will continue to work on it at a later time. You can see this as a draft for your future post.

save blogger post

Publishing the post

If you double or triple checked the post and there are no errors, then you are good to go. Still, it's a good idea to go through it at least one more time to ensure that all the content you want is there and you don't have to make any more changes. Add all the necessary labels and tags, make sure that you inserted any links, images and other information that you might need.

Once everything is ready, you will just have to press the Publish button located at the top of the panel. This is when Blogger will automatically redirect you to the Posts page. Here you will see the post right on top.

publish blogger post


Don't believe that your work is done at this point. In fact, it's far from that. You still have a long way to go before you properly optimize and improve your blog. After all, people won't be drawn in to your blog if you have just a single one to begin with. Work hard to write great posts as they will be able to make your blog stand out in the long haul.

Of course, you do need patience. Writing a good blog does require time and you shouldn't rush the content creation. Prioritize quality over quantity all the time. If you don't do that, the experience will be very well worth it in the end.

How can you expand your blog?

As we mentioned earlier, writing a single post is great but it won't draw in a lot of traffic. If you want to write a good post, one that will bring in lots of readers and views, you want to post as often as possible.

Quality content will always bring in traffic. Update the blog as often as you can. If you can share at least a post per week, you should do that. A good stream of posts will always come in handy, so make sure that you always write some good, enticing content that will help populate your blog.

If possible, we recommend you to create a post Schedule as this will help you better optimize the way you post. This way you will be able to prepare your content beforehand, so you can have it ready when you want to create a new post. The best approach is to write more than 1 post at a time. One can be posted and the others can be kept for a later date if you so desire.

create blogger posts

Write for a niche

Generalized content works but it won't really deliver good results for your audience. If you want to get the best results, we recommend you to find a niche as fast as possible. Not only does a niche help you target specific users, but it will also help you become an authority on that topic. We recommend you to research a niche and become an expert on it. This is the best way to create a large audience for a niche and from here to reaching success in blogging will be just a small step.

Don't rush the content creation process, especially if you write for a niche. Creating redundant content will just keep people away. As long as you take your time and focus on results for your audience, the experience will be an amazing one. Of course, use the proper content structure in order to cater to the needs of search engines, all while maintaining the content relevant for humans as well!

Reader interaction

Once you learn how to create a blog on Blogger you can create more than a blog in order to reach multiple audiences. But the idea here still remains, you will need to interact with the audience. The community will grow more and more as you put out content, so make sure that you always interact with the audience.

Read the comments and moderate them, make sure that you remove spam. Also, reply to people that are interested in what you write. This will help create and nurture a community around your content, which can be very interesting to do!

blogger comments

Advertising your blog

Your blog will need advertising if you want it to grow really fast. One of the best ways you can do that is by sharing it with people anywhere you can. From social networks to social media or any other location, all of these are great places where you can share your blog. We recommend you to try and do the following:
  • Post a short headline and a link to your article on Twitter
  • Single Blogger is a Google Product, make sure that you use the Google buttons in order to share on Google Plus and perform other similar actions.
  • Encourage readers and friends to share your Blogger posts on Facebook and anywhere they can. This will help you reach a large audience really fast.
  • Make sure that you comment on forums and other blogs. Link to your post there if it's meaningful for that particular topic. This type of practice is called backlinking and it's very good for SEO.

Place ads

Ads are very important if you want to monetize the blog. You won't be able to monetize your blog with AdSense unless you have a blog active for around 6 months, so keep that in mind. You also need to have at least 18 years of age and you also have to obey the TOS. AdSense allows you to receive payments based on the amount of impressions generated by your blog.

sign up for AdSense

Blog customization

You can modify just about anything you want on Blogger, it all comes down to you to make the right changes! For example, you will be able to press Layout and then you can modify the block content for each section of your blog. You also have the ability to Add a Gadget if you want. Blogger has lots of add-ons to choose from, all of which can help you better define your blog!

If you want to customize your Template, keep in mind that there are multiple customization options to choose from. You can also keep the template you have now. Programmers can press the Edit HTML button so they can modify the CSS and HTML code.

blogger template edit HTML

Stat tracking

Blogger has a dedicated option named Stats where you have the ability to monitor the blog performance. Here you have the ability to see the amount of views you get. This way you can identify what posts are performing better than others. As a result, you know what content works great for your audience in the longer term!

Learning how to create a Blogger account is really easy and you can feel free to create multiple blogs if you want. Just make sure that you write content for all of them. Plus, you can also monetize each one of your blogs if you so desire. Take your time and make sure that you provide valid information for your readers. This should be the main reason to create a Blogger account in the first place!
How to Create a Blogger Account?

Are you wondering how to create a Blogger account? Many of us do, because Blogger is one of the most popular blogging platforms out there and it can provide us with an extraordinary, fun way to express ourselves in the online world. Not only is it Blogger a very large blogging website, but it's also full of categories that you can blog on. You have complete control over what you want to blog, and that does make Blogger an amazing platform to begin with. Yet you do have to wonder how to create a blog on Blogger! We are here to help you understand all of that and so much more as fast as possible, thanks to a detailed guide that will showcase all the necessary instructions in a very easy to read manner.

how to create blogger account

Creating a Google account

What you need to know here is that Google owns Blogger, and because of that you will need to use a Google account to sign in to this platform. You can create a Google account now and then you will be able to continue to the platform without a problem. By creating a Google Account you will be able to access a wide range of Google apps and services like Drive or Mail for example. Visit the page above and share all the necessary information in order to create the necessary Google Account. Thankfully, the process is very easy and it will take only a few minutes of your time. In case you already have a Google Account, you will need to sign on the Blogger page.

create a google account

Creating your blog

Once you are located on the Blogger page, you will need to press the New Blog button in order to start a blog. You will receive a new window where you will learn how to create a Blogger account. This will enable you to share all the necessary information.
  • Make sure that you add a title for your blog in the Title area. This is very important because it will allow you to entice the visitor to read more about you and your content. So, try to make the title relevant and appealing
  • In order for users to find your blog, you will need to create an Address for it. Your blog will have a blogspot.com address, but you will need to choose what goes before blogspot.com. Basically, you can opt for something like abcdef.blogspot.com or anything like that. Remember that this can be modified in the long run. The great thing here is that you will immediately be able to see if that address is available or not. This means you will have the ability to check the address availability really fast.
  • The next step will require you to choose from any of the presets that are available at this point. Starting with a Template is a good idea, but do remember that this can be modified afterwards as well. So it's a good idea to just pick a template and move onward.
create a blogger account

Once you have the blog title, address and template ready to go, you will have to press the Create blog! button. This process will take a little bit until it's completed properly, so just wait for a few seconds as the new blog will soon be added to the blog list. So, if you were wondering how to create a blog on Blogger, this is the simplest way to do it.

Maybe the best thing about how to create a Blogger account is that the entire process is very easy to do. Even beginners will have no problem creating and setting up an account. The customization options are plentiful here, so you shouldn't have any problem setting your account really fast!

Although the blog address will be available, you can't call that a blog unless you start writing content in there. Obviously, you will need to learn how to write a post on Blogger, and we are here to help you with that right now.

In order to start writing, you will need to click the Create a new post link or you can press the New Post button. Once you do that, you will gain immediate access to the post editor and here you can write the blog as well as make any necessary changes to content that you already wrote.

create new blogger post

Write a title for your post

Your post needs to have a title. Towards the top of the Blogger editor you will see that there is a Post title box. Add in the desired post title there. This shouldn't eat up a lot of your time, just try to come up with a post title that is enticing, very easy to use and a delight to read for your audience. A catchy title can be great. Don't opt for the clickbait title that you can see nowadays, make your title feel informative and fun to read as that's what you want. If you want to write a first post, you need to make it introductory. Write about the goals you have, the type of content you want to add and so on. It will not be easy to write down the first words, but if you create a good title it will be easier for you to translate thoughts into words!

create blogger post title

Start the writing process

You can create a Blogger post in 2 ways. You can either write the post in HTML or you can use the word processor included here. You have a button located in the top left corner which helps you switch between any of these two writing models. The HTML editor helps you create better web content and you can also use it to insert some special web functions. On the other hand, the word processor is more than qualified to offer you all the extra help you might need here.

blogger post compose html

Customizing text

If you want, you will be able to customize the text you want without a problem. You will have the ability to use the toolbar located on top of the editor to modify the text as you see fit. This includes formatting, color, size, alignment and so on. You have a Normal drop-down that helps you change the type of content you want to add, so you should consider changing between the desired heading type as you see fit. This also changes the way search engines process your content, so keep that in mind.  If possible, try to break the content into easy to read pieces. Use the Headings in a strategic manner.

blogger post heading

Add an image to your post

If you want to make your blog post enticing, you should try to add at least an image. These images make posts a lot easier to read and it's a good idea to make the most out of images if you want to share a great experience for your audience. You will have an "Insert Image" button right above your text editor, on the toolbar. There are multiple options, you can either upload them from your PC/Mac, you can share a link or you can use your webcam to take a picture if you want. However, if you link to other websites, make sure that you showcase their copyright or just refrain from doing that to begin with. There are many sites who do not agree with the idea of having their content stolen, so try to stay away from that!

insert image in Blogger post

Modify the post settings

If you look on the right side of your Post Editor, you will be able to access some Post settings. Remember that these make it easy for you to customize your post right before you choose to publish it!

blogger post settings
  • Labels are useful if you want to group multiple posts which are very similar to one another.
  • Schedule allows you to publish your content at a later date. It can come in handy if you don't want to share multiple articles at the same time.
  • Permalink is an option that allows you to select the way your post will be linked to in the future. Usually it will maintain the title structure, but there are other link types you can choose from as well.
  • Location enables you to add a location tag for your post. It's a very good tool for those that move/travel often
  • Options allows you to modify some features like the user ability to comment on a post for example. You can also choose the way your HTML code is interpreted here as well.

Previewing

A great thing about previewing your post is that you will be able to see how it looks when a reader will access it. This is the right time when you need to check your post for any errors, be it grammar or structural ones.

preview blogger post

Save the post for later

This is not the same as scheduling. When you save the post for later, it means that the post just isn't finished at this time and you will continue to work on it at a later time. You can see this as a draft for your future post.

save blogger post

Publishing the post

If you double or triple checked the post and there are no errors, then you are good to go. Still, it's a good idea to go through it at least one more time to ensure that all the content you want is there and you don't have to make any more changes. Add all the necessary labels and tags, make sure that you inserted any links, images and other information that you might need.

Once everything is ready, you will just have to press the Publish button located at the top of the panel. This is when Blogger will automatically redirect you to the Posts page. Here you will see the post right on top.

publish blogger post


Don't believe that your work is done at this point. In fact, it's far from that. You still have a long way to go before you properly optimize and improve your blog. After all, people won't be drawn in to your blog if you have just a single one to begin with. Work hard to write great posts as they will be able to make your blog stand out in the long haul.

Of course, you do need patience. Writing a good blog does require time and you shouldn't rush the content creation. Prioritize quality over quantity all the time. If you don't do that, the experience will be very well worth it in the end.

How can you expand your blog?

As we mentioned earlier, writing a single post is great but it won't draw in a lot of traffic. If you want to write a good post, one that will bring in lots of readers and views, you want to post as often as possible.

Quality content will always bring in traffic. Update the blog as often as you can. If you can share at least a post per week, you should do that. A good stream of posts will always come in handy, so make sure that you always write some good, enticing content that will help populate your blog.

If possible, we recommend you to create a post Schedule as this will help you better optimize the way you post. This way you will be able to prepare your content beforehand, so you can have it ready when you want to create a new post. The best approach is to write more than 1 post at a time. One can be posted and the others can be kept for a later date if you so desire.

create blogger posts

Write for a niche

Generalized content works but it won't really deliver good results for your audience. If you want to get the best results, we recommend you to find a niche as fast as possible. Not only does a niche help you target specific users, but it will also help you become an authority on that topic. We recommend you to research a niche and become an expert on it. This is the best way to create a large audience for a niche and from here to reaching success in blogging will be just a small step.

Don't rush the content creation process, especially if you write for a niche. Creating redundant content will just keep people away. As long as you take your time and focus on results for your audience, the experience will be an amazing one. Of course, use the proper content structure in order to cater to the needs of search engines, all while maintaining the content relevant for humans as well!

Reader interaction

Once you learn how to create a blog on Blogger you can create more than a blog in order to reach multiple audiences. But the idea here still remains, you will need to interact with the audience. The community will grow more and more as you put out content, so make sure that you always interact with the audience.

Read the comments and moderate them, make sure that you remove spam. Also, reply to people that are interested in what you write. This will help create and nurture a community around your content, which can be very interesting to do!

blogger comments

Advertising your blog

Your blog will need advertising if you want it to grow really fast. One of the best ways you can do that is by sharing it with people anywhere you can. From social networks to social media or any other location, all of these are great places where you can share your blog. We recommend you to try and do the following:
  • Post a short headline and a link to your article on Twitter
  • Single Blogger is a Google Product, make sure that you use the Google buttons in order to share on Google Plus and perform other similar actions.
  • Encourage readers and friends to share your Blogger posts on Facebook and anywhere they can. This will help you reach a large audience really fast.
  • Make sure that you comment on forums and other blogs. Link to your post there if it's meaningful for that particular topic. This type of practice is called backlinking and it's very good for SEO.

Place ads

Ads are very important if you want to monetize the blog. You won't be able to monetize your blog with AdSense unless you have a blog active for around 6 months, so keep that in mind. You also need to have at least 18 years of age and you also have to obey the TOS. AdSense allows you to receive payments based on the amount of impressions generated by your blog.

sign up for AdSense

Blog customization

You can modify just about anything you want on Blogger, it all comes down to you to make the right changes! For example, you will be able to press Layout and then you can modify the block content for each section of your blog. You also have the ability to Add a Gadget if you want. Blogger has lots of add-ons to choose from, all of which can help you better define your blog!

If you want to customize your Template, keep in mind that there are multiple customization options to choose from. You can also keep the template you have now. Programmers can press the Edit HTML button so they can modify the CSS and HTML code.

blogger template edit HTML

Stat tracking

Blogger has a dedicated option named Stats where you have the ability to monitor the blog performance. Here you have the ability to see the amount of views you get. This way you can identify what posts are performing better than others. As a result, you know what content works great for your audience in the longer term!

Learning how to create a Blogger account is really easy and you can feel free to create multiple blogs if you want. Just make sure that you write content for all of them. Plus, you can also monetize each one of your blogs if you so desire. Take your time and make sure that you provide valid information for your readers. This should be the main reason to create a Blogger account in the first place!
Posted at December 24, 2020 |  by Online Ustaad
It can be a frustrating experience when you find your Gmail account is no longer active. Having your Gmail account disabled means losing access to the products by Google that were linked. There are several reasons why your account may have been ended that are mostly due to the Terms of Service policies by Google itself. So, if you have violated one more of the polices either intentionally or not, you can find yourself with a disabled Gmail account.

Adding to the frustration is that Google will often disable the account with no warning. However, the good news is that there are simple methods for getting your account back online.

get disabled gmail account back

Gmail Account Temporarily Disabled

This is generally the easiest to overcome as Google believes that your account may be compromised. To rectify the situation, you will be asked to provide your mobile number or recover email identification. If you do either, they will send you a text message that will allow you to access your account quickly. You will need to do so within a 48-hour period otherwise it will become more difficult to get back your account.

Gmail Account Disabled Due To Perceived ToS Violation

If your Gmail account disabled included a terms of service (ToS) violation warning, then you will need to fill out their contact form so the process of getting your Gmail account back can begin. You should read the ToS thoroughly so that the violation will not happen again and provide the email address. If you do not get a response, repeat the step every two days until you do.

gmail account disabled
Gmail account disabled - Google contact form screenshot

Once they have responded, the next step should be to get your Gmail back so that you can gain automatic access to all the Google products including AdSense. You can also visit the help forum where you can open a 'Gmail account disabled' topic. Just focus on the Gmail account itself first as that is the key to the rest of your Google services. You'll want to discuss the issues that you are facing and why this needs to be resolved as quickly as possible. If the Top Contributor pings your thread to the staff at Google, then you should expect your account to be back online in 48 hours or two business days.

Gmail Account Disabled Due To Serious ToS Violations

If the Gmail account disabled was due to a serious violation of the Terms of Service agreement, as well as the Google policies that oversee your account, then you will have considerable difficulty in getting your account back. Such violations would include your AdSense account being involved in click fraud, for example. Serious violations that are clear will make it virtually impossible for your account to be restored.

If what happened was not considered a serious violation, then you should be able to get your account up and running within 24 to 48 hours depending on the circumstances. It pays however, to keep all your important data and information outside of your Google accounts in case of getting a Gmail account disabled result. By protecting yourself, the impact will be easier to handle until you can get your account back online.

How to Get a Disabled Gmail Account Back

It can be a frustrating experience when you find your Gmail account is no longer active. Having your Gmail account disabled means losing access to the products by Google that were linked. There are several reasons why your account may have been ended that are mostly due to the Terms of Service policies by Google itself. So, if you have violated one more of the polices either intentionally or not, you can find yourself with a disabled Gmail account.

Adding to the frustration is that Google will often disable the account with no warning. However, the good news is that there are simple methods for getting your account back online.

get disabled gmail account back

Gmail Account Temporarily Disabled

This is generally the easiest to overcome as Google believes that your account may be compromised. To rectify the situation, you will be asked to provide your mobile number or recover email identification. If you do either, they will send you a text message that will allow you to access your account quickly. You will need to do so within a 48-hour period otherwise it will become more difficult to get back your account.

Gmail Account Disabled Due To Perceived ToS Violation

If your Gmail account disabled included a terms of service (ToS) violation warning, then you will need to fill out their contact form so the process of getting your Gmail account back can begin. You should read the ToS thoroughly so that the violation will not happen again and provide the email address. If you do not get a response, repeat the step every two days until you do.

gmail account disabled
Gmail account disabled - Google contact form screenshot

Once they have responded, the next step should be to get your Gmail back so that you can gain automatic access to all the Google products including AdSense. You can also visit the help forum where you can open a 'Gmail account disabled' topic. Just focus on the Gmail account itself first as that is the key to the rest of your Google services. You'll want to discuss the issues that you are facing and why this needs to be resolved as quickly as possible. If the Top Contributor pings your thread to the staff at Google, then you should expect your account to be back online in 48 hours or two business days.

Gmail Account Disabled Due To Serious ToS Violations

If the Gmail account disabled was due to a serious violation of the Terms of Service agreement, as well as the Google policies that oversee your account, then you will have considerable difficulty in getting your account back. Such violations would include your AdSense account being involved in click fraud, for example. Serious violations that are clear will make it virtually impossible for your account to be restored.

If what happened was not considered a serious violation, then you should be able to get your account up and running within 24 to 48 hours depending on the circumstances. It pays however, to keep all your important data and information outside of your Google accounts in case of getting a Gmail account disabled result. By protecting yourself, the impact will be easier to handle until you can get your account back online.

Posted at December 24, 2020 |  by Online Ustaad

Tuesday, December 22, 2020

It is becoming increasingly important to make our posts appreciated and shared on social networks and one of the best ways to get traffic to our blog or site and boost sharing stats is to add social sharing buttons.

In this tutorial we will see how to add a floating social media sharing bar below the title of Blogger posts, so when a reader scrolls down the page, he will still be able to see the sharing buttons without having to scroll back to the top.

floating social media for blogger
Adding the below jQuery script will make the buttons float in a fixed position as soon as they reach "the top" of the page. By scrolling back, the buttons will return to their initial position. The social sharing bar includes buttons for Facebook, Twitter, Google+, and Pinterest.

Social Media Sharing Buttons below Blogger Post Title

  1. From the Blogger Dashboard, go to "Template" and click on the "Edit HTML" button:

  2. Click anywhere inside the code area and press the CTRL + F keys to open the search box. Once you see the search box, type the </head> tag inside the search box and hit Enter to find it.

    blogger search box, ctrl + f
  3. Just above </head> add this script:
    <script src='http://ajax.googleapis.com/ajax/libs/jquery/1.7.1/jquery.min.js' type='text/javascript'/>

    <script type='text/javascript'>
    //<![CDATA[
    $(function() {
    var $movesbuttons = $("#floating-social-buttons"),
    $window = $(window),
    offset = $movesbuttons.offset();
    $window.scroll(function() {
    if ($window.scrollTop() > offset.top) {
    $movesbuttons.css({'position' : 'fixed', 'width' : '550px', 'top' : '0px'});
    } else {
    $movesbuttons.css({'position' : 'absolute', 'top' : 'auto'});
    }
    });
    });
    //]]>
    </script>
  4. Now before the ]]></b:skin> tag (press CTRL + F to find it) add the following CSS styles:
    #floating-social-buttons {
    padding: 6px 0px 12px;
    position: absolute;
    background: #F6F6F6;
    border-bottom: 1px solid #DEDEDE;
    width: 550px;
    height: 18px;
    z-index: 99;
    }
    .floating-social-buttons {
    margin-left: 5px !important;
    }
    .floating-social-buttons li {
    float: left;
    margin-left: 5px;
    list-style:none;
    }
    To change the width of the bar, modify the 550px values in red. Note that this value also appears in the script which also needs to be modified
  5. Finally, just below the second <div class='post-header'> (press CTRL + F and hit Enter twice to find the second one) add the following code:
    <b:if cond='data:blog.pageType == &quot;item&quot;'>
    <div style='padding:5px 0 35px 0;clear:both;'>
    <div id='floating-social-buttons'>
    <ul class='floating-social-buttons'>

    <li><iframe allowTransparency='true' expr:src='&quot;http://www.facebook.com/plugins/like.php?href=&quot; + data:post.url+ &quot;&amp;layout=button_count&amp;show_faces=false&amp;width=100&amp;height=25&amp;action=like&amp;font=tahoma&amp;colorscheme=light&quot;' frameborder='0' scrolling='no' style='border:none; overflow:hidden; width:100px; height:25px;'/></li>

    <li><a class='twitter-share-button' data-lang='en' href='https://twitter.com/share'>Tweet</a><script src='//platform.twitter.com/widgets.js' type='text/javascript'/></li>

    <li><script src='http://apis.google.com/js/plusone.js' type='text/javascript'/><g:plusone expr:href='data:post.url' size='medium'/></li>

    <li><a class='pin-it-button' count-layout='horizontal' expr:href='&quot;http://pinterest.com/pin/create/button/?url=&quot; + data:post.url + &quot;&amp;media=&quot; + data:post.thumbnailUrl + &quot;&amp;description=&quot; + data:post.snippet' style='margin:0 10px 5px 0;'>Pin It</a> <script src='http://assets.pinterest.com/js/pinit.js' type='text/javascript'/></li>

    </ul>
    </div>
    </div>
    </b:if>
  6. Click on the "Save template" button and you're done :)

Customizing the Floating Social Media Sharing buttons

  • If you want the buttons to appear at the end of the post, paste this code before or after <div class='post-footer'>
  • If the bar overlaps with the post content, then change 35px to a higher value.
So these were the steps for adding the horizontal social buttons bar on Blogger. Using this bar it is also useful as it could help you to get more social traffic for your blog.

Add floating social media sharing buttons below Blogger post titles

It is becoming increasingly important to make our posts appreciated and shared on social networks and one of the best ways to get traffic to our blog or site and boost sharing stats is to add social sharing buttons.

In this tutorial we will see how to add a floating social media sharing bar below the title of Blogger posts, so when a reader scrolls down the page, he will still be able to see the sharing buttons without having to scroll back to the top.

floating social media for blogger
Adding the below jQuery script will make the buttons float in a fixed position as soon as they reach "the top" of the page. By scrolling back, the buttons will return to their initial position. The social sharing bar includes buttons for Facebook, Twitter, Google+, and Pinterest.

Social Media Sharing Buttons below Blogger Post Title

  1. From the Blogger Dashboard, go to "Template" and click on the "Edit HTML" button:

  2. Click anywhere inside the code area and press the CTRL + F keys to open the search box. Once you see the search box, type the </head> tag inside the search box and hit Enter to find it.

    blogger search box, ctrl + f
  3. Just above </head> add this script:
    <script src='http://ajax.googleapis.com/ajax/libs/jquery/1.7.1/jquery.min.js' type='text/javascript'/>

    <script type='text/javascript'>
    //<![CDATA[
    $(function() {
    var $movesbuttons = $("#floating-social-buttons"),
    $window = $(window),
    offset = $movesbuttons.offset();
    $window.scroll(function() {
    if ($window.scrollTop() > offset.top) {
    $movesbuttons.css({'position' : 'fixed', 'width' : '550px', 'top' : '0px'});
    } else {
    $movesbuttons.css({'position' : 'absolute', 'top' : 'auto'});
    }
    });
    });
    //]]>
    </script>
  4. Now before the ]]></b:skin> tag (press CTRL + F to find it) add the following CSS styles:
    #floating-social-buttons {
    padding: 6px 0px 12px;
    position: absolute;
    background: #F6F6F6;
    border-bottom: 1px solid #DEDEDE;
    width: 550px;
    height: 18px;
    z-index: 99;
    }
    .floating-social-buttons {
    margin-left: 5px !important;
    }
    .floating-social-buttons li {
    float: left;
    margin-left: 5px;
    list-style:none;
    }
    To change the width of the bar, modify the 550px values in red. Note that this value also appears in the script which also needs to be modified
  5. Finally, just below the second <div class='post-header'> (press CTRL + F and hit Enter twice to find the second one) add the following code:
    <b:if cond='data:blog.pageType == &quot;item&quot;'>
    <div style='padding:5px 0 35px 0;clear:both;'>
    <div id='floating-social-buttons'>
    <ul class='floating-social-buttons'>

    <li><iframe allowTransparency='true' expr:src='&quot;http://www.facebook.com/plugins/like.php?href=&quot; + data:post.url+ &quot;&amp;layout=button_count&amp;show_faces=false&amp;width=100&amp;height=25&amp;action=like&amp;font=tahoma&amp;colorscheme=light&quot;' frameborder='0' scrolling='no' style='border:none; overflow:hidden; width:100px; height:25px;'/></li>

    <li><a class='twitter-share-button' data-lang='en' href='https://twitter.com/share'>Tweet</a><script src='//platform.twitter.com/widgets.js' type='text/javascript'/></li>

    <li><script src='http://apis.google.com/js/plusone.js' type='text/javascript'/><g:plusone expr:href='data:post.url' size='medium'/></li>

    <li><a class='pin-it-button' count-layout='horizontal' expr:href='&quot;http://pinterest.com/pin/create/button/?url=&quot; + data:post.url + &quot;&amp;media=&quot; + data:post.thumbnailUrl + &quot;&amp;description=&quot; + data:post.snippet' style='margin:0 10px 5px 0;'>Pin It</a> <script src='http://assets.pinterest.com/js/pinit.js' type='text/javascript'/></li>

    </ul>
    </div>
    </div>
    </b:if>
  6. Click on the "Save template" button and you're done :)

Customizing the Floating Social Media Sharing buttons

  • If you want the buttons to appear at the end of the post, paste this code before or after <div class='post-footer'>
  • If the bar overlaps with the post content, then change 35px to a higher value.
So these were the steps for adding the horizontal social buttons bar on Blogger. Using this bar it is also useful as it could help you to get more social traffic for your blog.

Posted at December 22, 2020 |  by Online Ustaad
AddThis is the most complete social sharing service allowing you to share your posts in more than 270 different social networks. If you want to use the AddThis widget and get the AddThis sharing buttons, this tutorial will show you how to register and add this feature on your blog. Plus, you will get to know some of the customization options of these buttons. So let's get started!

Getting the AddThis share buttons code

Step 1. Visit the https://www.addthis.com/get/sharing page.

Step 2. To get the sharing buttons and to access the AddThis sharing stats to find out how many people shared your post by using the AddThis feature, click on the "Create account" button.

create addthis account

The site will ask you to make a small registration. Fill out the information to register. It's quick, simple and it's free. To finish the registration, click on the Register button.

register addthis

Step 3. After you've been logged in, right below the "Get sharing buttons for", choose the "A website" option.

addthis share buttons

Step 4. In the "Select style" section, choose the buttons style that you think would look the best on your site/blog. Please note that on the right side you can see a preview of these buttons.

addthis sharing buttons

Step 5. After you have chosen the style, the site will provide a code - click on the "Grab it" button to copy it.

addthis code

The code provided will look like this:
<!-- AddThis Button BEGIN -->
<div class="addthis_toolbox addthis_default_style ">
<a class="addthis_button_facebook_like" fb:like:layout="button_count"></a>
<a class="addthis_button_tweet"></a>
<a class="addthis_button_pinterest_pinit" pi:pinit:layout="horizontal"></a>
<a class="addthis_counter addthis_pill_style"></a>
</div>
<script type="text/javascript">var addthis_config = {"data_track_addressbar":true};</script>
<script type="text/javascript" src="//s7.addthis.com/js/300/addthis_widget.js#pubid=ra-XXXXXXXXXXX"></script>
<!-- AddThis Button END -->
Now that you have selected and set up your AddThis sharing buttons, let's add them in the footer of the posts.

Adding the AddThis sharing buttons on Blogger

Step 1. Access your Blogger Dashboard and go to "Template", then click on the "Edit HTML" button on the right side:

blogger template

Step 2. Click anywhere inside the code area and press the CTRL + F keys to open the search box.

Step 3. Type the following line inside the search box and try to find the second occurrence of it - hit Enter:
<div class='post-footer'>
Step 4. Just above this line, add the code for the AddThis social sharing buttons.

Note: If you want to add at the beginning of your posts, add the code below the second:
<div class='post-header'>

How to add more AddThis buttons

To add more buttons, simply choose the button for that social network and add the code just before the </div> tag (refer to the step 5 from above).

Some examples:
<a class="addthis_button_linkedin"></a> /* linkedin button */
<a class="addthis_button_google_plusone" g:plusone:size="medium"></a> /*gplus button */

<a class="addthis_button_digg"></a> /* digg button */

<a class="addthis_button_stumbleupon"></a> /* stumbleupon button */
<a class="addthis_button_print"></a> /* print button */

CSS3 AddThis Share Buttons

You can add just a single button, so that when the reader hovers over it, a menu will open with the options of social networks to share the post.

css3 share buttons, addthis

Visit this page for a demo.

Step 1. Go to "Template" > click on the "Edit HTML" button > press the CTRL + F keys and search:
<div class='post-footer'>
Just above this line, paste the following code:
<style type='text/css'>
.addthis_share_btn a, .addthis_share_btn a:visited {
background: #FF5C00; /* background color of the button */
display: inline-block;
padding: 6px 12px;
font-family: arial,helvetica,lucida,verdana,sans-serif;
font-size: 12px;
line-height: 1em;
color: #fff;
text-decoration: none;
-moz-border-radius: 5px;
-webkit-border-radius: 5px;
-moz-box-shadow: 0 1px 3px rgba(0,0,0,0.5);
-webkit-box-shadow: 0 1px 3px rgba(0,0,0,0.5);
border-radius: 5px;
box-shadow: 0 1px 3px rgba(0,0,0,0.5);
text-shadow: 0 -1px 1px rgba(0,0,0,0.25);
border-bottom: 1px solid rgba(0,0,0,0.25);
position: relative;
cursor: pointer;
}
.addthis_share_btn a:hover {
background: #D45500; /* background color on mouse hover */
color: #fff;
}
.addthis_share_btn a:active { top: 1px; }

.addthis_share_btn a span, .addthis_share_btn:visited a span {
background: url(http://www.addthis.com/cms-content/images/gallery/icon-addthis.gif) no-repeat left;
padding: 1px 0 1px 18px;
}
</style>
<!-- AddThis Share Button -->
<div class='addthis_toolbox addthis_share_btn'>
<a class='addthis_button_compact' href='http://addthis.com/bookmark.php'>
<span>Share</span></a>
</div>
<script src='http://s7.addthis.com/js/250/addthis_widget.js' type='text/javascript'/>
<!-- End AddThis Share Button -->

Customization

  • To change the color of the button according to the colors of your template, modify the color value in red.
  • If you want to change the "Share" text, replace the text in blue.
Step 2. Save the changes by clicking on the "Save template" button and you're done!

Share Blog Posts in Social Media using AddThis

AddThis is the most complete social sharing service allowing you to share your posts in more than 270 different social networks. If you want to use the AddThis widget and get the AddThis sharing buttons, this tutorial will show you how to register and add this feature on your blog. Plus, you will get to know some of the customization options of these buttons. So let's get started!

Getting the AddThis share buttons code

Step 1. Visit the https://www.addthis.com/get/sharing page.

Step 2. To get the sharing buttons and to access the AddThis sharing stats to find out how many people shared your post by using the AddThis feature, click on the "Create account" button.

create addthis account

The site will ask you to make a small registration. Fill out the information to register. It's quick, simple and it's free. To finish the registration, click on the Register button.

register addthis

Step 3. After you've been logged in, right below the "Get sharing buttons for", choose the "A website" option.

addthis share buttons

Step 4. In the "Select style" section, choose the buttons style that you think would look the best on your site/blog. Please note that on the right side you can see a preview of these buttons.

addthis sharing buttons

Step 5. After you have chosen the style, the site will provide a code - click on the "Grab it" button to copy it.

addthis code

The code provided will look like this:
<!-- AddThis Button BEGIN -->
<div class="addthis_toolbox addthis_default_style ">
<a class="addthis_button_facebook_like" fb:like:layout="button_count"></a>
<a class="addthis_button_tweet"></a>
<a class="addthis_button_pinterest_pinit" pi:pinit:layout="horizontal"></a>
<a class="addthis_counter addthis_pill_style"></a>
</div>
<script type="text/javascript">var addthis_config = {"data_track_addressbar":true};</script>
<script type="text/javascript" src="//s7.addthis.com/js/300/addthis_widget.js#pubid=ra-XXXXXXXXXXX"></script>
<!-- AddThis Button END -->
Now that you have selected and set up your AddThis sharing buttons, let's add them in the footer of the posts.

Adding the AddThis sharing buttons on Blogger

Step 1. Access your Blogger Dashboard and go to "Template", then click on the "Edit HTML" button on the right side:

blogger template

Step 2. Click anywhere inside the code area and press the CTRL + F keys to open the search box.

Step 3. Type the following line inside the search box and try to find the second occurrence of it - hit Enter:
<div class='post-footer'>
Step 4. Just above this line, add the code for the AddThis social sharing buttons.

Note: If you want to add at the beginning of your posts, add the code below the second:
<div class='post-header'>

How to add more AddThis buttons

To add more buttons, simply choose the button for that social network and add the code just before the </div> tag (refer to the step 5 from above).

Some examples:
<a class="addthis_button_linkedin"></a> /* linkedin button */
<a class="addthis_button_google_plusone" g:plusone:size="medium"></a> /*gplus button */

<a class="addthis_button_digg"></a> /* digg button */

<a class="addthis_button_stumbleupon"></a> /* stumbleupon button */
<a class="addthis_button_print"></a> /* print button */

CSS3 AddThis Share Buttons

You can add just a single button, so that when the reader hovers over it, a menu will open with the options of social networks to share the post.

css3 share buttons, addthis

Visit this page for a demo.

Step 1. Go to "Template" > click on the "Edit HTML" button > press the CTRL + F keys and search:
<div class='post-footer'>
Just above this line, paste the following code:
<style type='text/css'>
.addthis_share_btn a, .addthis_share_btn a:visited {
background: #FF5C00; /* background color of the button */
display: inline-block;
padding: 6px 12px;
font-family: arial,helvetica,lucida,verdana,sans-serif;
font-size: 12px;
line-height: 1em;
color: #fff;
text-decoration: none;
-moz-border-radius: 5px;
-webkit-border-radius: 5px;
-moz-box-shadow: 0 1px 3px rgba(0,0,0,0.5);
-webkit-box-shadow: 0 1px 3px rgba(0,0,0,0.5);
border-radius: 5px;
box-shadow: 0 1px 3px rgba(0,0,0,0.5);
text-shadow: 0 -1px 1px rgba(0,0,0,0.25);
border-bottom: 1px solid rgba(0,0,0,0.25);
position: relative;
cursor: pointer;
}
.addthis_share_btn a:hover {
background: #D45500; /* background color on mouse hover */
color: #fff;
}
.addthis_share_btn a:active { top: 1px; }

.addthis_share_btn a span, .addthis_share_btn:visited a span {
background: url(http://www.addthis.com/cms-content/images/gallery/icon-addthis.gif) no-repeat left;
padding: 1px 0 1px 18px;
}
</style>
<!-- AddThis Share Button -->
<div class='addthis_toolbox addthis_share_btn'>
<a class='addthis_button_compact' href='http://addthis.com/bookmark.php'>
<span>Share</span></a>
</div>
<script src='http://s7.addthis.com/js/250/addthis_widget.js' type='text/javascript'/>
<!-- End AddThis Share Button -->

Customization

  • To change the color of the button according to the colors of your template, modify the color value in red.
  • If you want to change the "Share" text, replace the text in blue.
Step 2. Save the changes by clicking on the "Save template" button and you're done!

Posted at December 22, 2020 |  by Online Ustaad
© 2013 OU Free Video Tutorials. All rights reserved
back to top