All Stories

Thursday, December 31, 2020

When you upload a template, sometimes you can see posted dates of blog posts showing as "undefined". This is not a error in the template. To fix this problem you need to change "Timestamp Format" of your blog.

Posted Date Undefined Error in Blogger

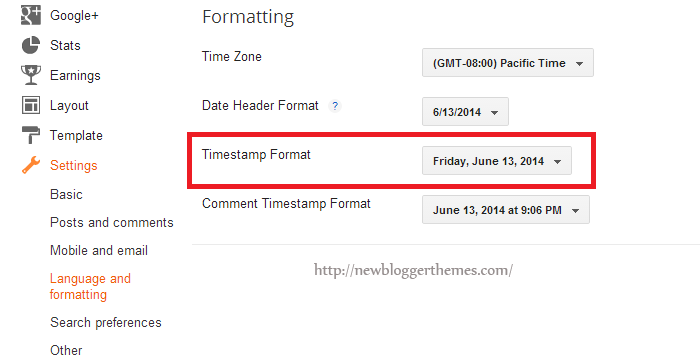
First go to your blog "Settings" --> "Language and formatting".

Select "Timestamp Format" from drop-down menu similar to "Friday, June 13, 2014" format.

Important: You need to change "Timestamp Format". Not "Comment Timestamp Format".

Timestamp Format in Blogger

Click on "Save settings" button and you are done.

How to Fix Posted Date Undefined Error in Blogger

When you upload a template, sometimes you can see posted dates of blog posts showing as "undefined". This is not a error in the template. To fix this problem you need to change "Timestamp Format" of your blog.

Posted Date Undefined Error in Blogger

First go to your blog "Settings" --> "Language and formatting".

Select "Timestamp Format" from drop-down menu similar to "Friday, June 13, 2014" format.

Important: You need to change "Timestamp Format". Not "Comment Timestamp Format".

Timestamp Format in Blogger

Click on "Save settings" button and you are done.

Posted at December 31, 2020 |  by Online Ustaad

0 comments:

Sunday, December 27, 2020

Image

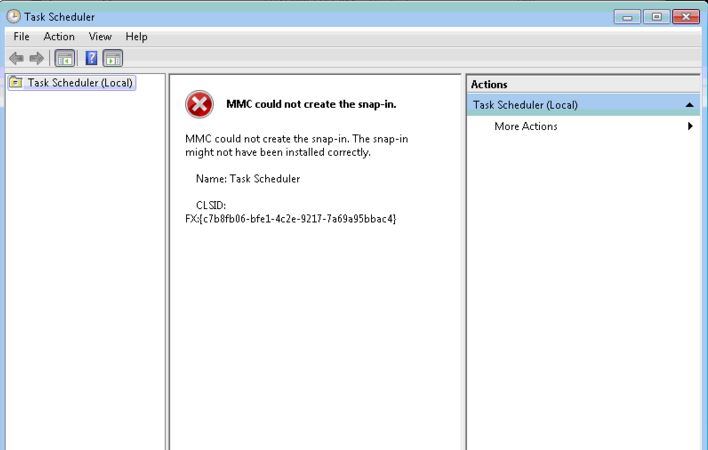
Microsoft Management Console (MMC) is a built-in feature in Windows operating system that lets you manage snap-in on the go. Snap-ins are basic component of a console. Sometimes, snap-ins may not work properly, especially if the registry configuration of a snap-in is broken. If you're going to look on the error message, you'll notice the CLSID:FX:{c7b8fb06-bfe1-4c2e-9217-7a69a95bbac4} which can help us investigate and isolate the issue. That said, you may need to modify the Windows registry.

Disclaimer: Serious problems might occur if you modify the registry incorrectly by using Registry editor or by using another method. These problems might require that you reinstall the operating system, and Microsoft cannot guarantee that it can be solved. Modify the registry at your own risk.

If you want to proceed, follow these steps to troubleshoot your the issue with MMC.

Press the Windows key + R on your keyboard, then type in regedit.

In the left pane, navigate to this location: "HKEY_LOCAL_MACHINE\SOFTWARE\Microsoft\MMC\SnapIns\FX:{c7b8fb06-bfe1-4c2e-9217-7a69a95bbac4}"

Right-click on the folder, then click Export. (This will let you backup the registry key into .reg file)

Right-click onto it again, then click Delete.

Click Yes when the confirmation box appears.

Close the Windows Registry, and restart your computer.

After restarting your computer, Windows should automatically generate the required registry configuration for the Task Scheduler and solves the problem.


How to fix MMC could not create the snap-in while opening task scheduler?

Image

Microsoft Management Console (MMC) is a built-in feature in Windows operating system that lets you manage snap-in on the go. Snap-ins are basic component of a console. Sometimes, snap-ins may not work properly, especially if the registry configuration of a snap-in is broken. If you're going to look on the error message, you'll notice the CLSID:FX:{c7b8fb06-bfe1-4c2e-9217-7a69a95bbac4} which can help us investigate and isolate the issue. That said, you may need to modify the Windows registry.

Disclaimer: Serious problems might occur if you modify the registry incorrectly by using Registry editor or by using another method. These problems might require that you reinstall the operating system, and Microsoft cannot guarantee that it can be solved. Modify the registry at your own risk.

If you want to proceed, follow these steps to troubleshoot your the issue with MMC.

Press the Windows key + R on your keyboard, then type in regedit.

In the left pane, navigate to this location: "HKEY_LOCAL_MACHINE\SOFTWARE\Microsoft\MMC\SnapIns\FX:{c7b8fb06-bfe1-4c2e-9217-7a69a95bbac4}"

Right-click on the folder, then click Export. (This will let you backup the registry key into .reg file)

Right-click onto it again, then click Delete.

Click Yes when the confirmation box appears.

Close the Windows Registry, and restart your computer.

After restarting your computer, Windows should automatically generate the required registry configuration for the Task Scheduler and solves the problem.


Posted at December 27, 2020 |  by Online Ustaad

0 comments:


Step.1:

  • Make a file named fullyautodial.bat
  • Right click and select edit.
  • Put the following inside it: rasdial connection nameusername password
  • Connection name = the connection you want to auto connect
  • Username = your username for this network.
  • password = your password for this network


Step. 2:

    Complete Task Management with settings.


Thanks for Visit. 😃


How to Create a Fully Automatic dialup PPPoE Internet Connection in Windows 8/10?


Step.1:

  • Make a file named fullyautodial.bat
  • Right click and select edit.
  • Put the following inside it: rasdial connection nameusername password
  • Connection name = the connection you want to auto connect
  • Username = your username for this network.
  • password = your password for this network


Step. 2:

    Complete Task Management with settings.


Thanks for Visit. 😃


Posted at December 27, 2020 |  by Online Ustaad

0 comments:

Thursday, December 24, 2020

Are you wondering how to create a Blogger account? Many of us do, because Blogger is one of the most popular blogging platforms out there and it can provide us with an extraordinary, fun way to express ourselves in the online world. Not only is it Blogger a very large blogging website, but it's also full of categories that you can blog on. You have complete control over what you want to blog, and that does make Blogger an amazing platform to begin with. Yet you do have to wonder how to create a blog on Blogger! We are here to help you understand all of that and so much more as fast as possible, thanks to a detailed guide that will showcase all the necessary instructions in a very easy to read manner.

how to create blogger account

Creating a Google account

What you need to know here is that Google owns Blogger, and because of that you will need to use a Google account to sign in to this platform. You can create a Google account now and then you will be able to continue to the platform without a problem. By creating a Google Account you will be able to access a wide range of Google apps and services like Drive or Mail for example. Visit the page above and share all the necessary information in order to create the necessary Google Account. Thankfully, the process is very easy and it will take only a few minutes of your time. In case you already have a Google Account, you will need to sign on the Blogger page.

create a google account

Creating your blog

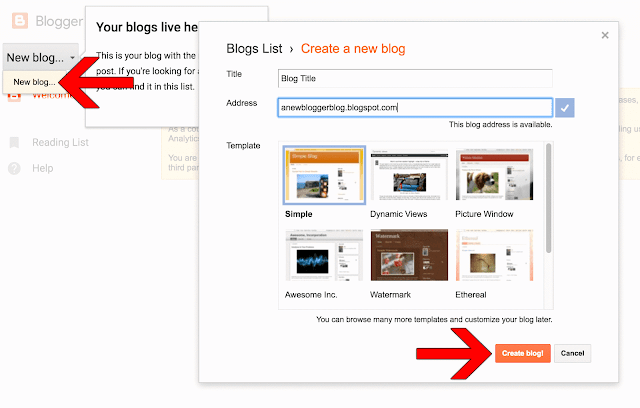
Once you are located on the Blogger page, you will need to press the New Blog button in order to start a blog. You will receive a new window where you will learn how to create a Blogger account. This will enable you to share all the necessary information.
  • Make sure that you add a title for your blog in the Title area. This is very important because it will allow you to entice the visitor to read more about you and your content. So, try to make the title relevant and appealing
  • In order for users to find your blog, you will need to create an Address for it. Your blog will have a blogspot.com address, but you will need to choose what goes before blogspot.com. Basically, you can opt for something like abcdef.blogspot.com or anything like that. Remember that this can be modified in the long run. The great thing here is that you will immediately be able to see if that address is available or not. This means you will have the ability to check the address availability really fast.
  • The next step will require you to choose from any of the presets that are available at this point. Starting with a Template is a good idea, but do remember that this can be modified afterwards as well. So it's a good idea to just pick a template and move onward.
create a blogger account

Once you have the blog title, address and template ready to go, you will have to press the Create blog! button. This process will take a little bit until it's completed properly, so just wait for a few seconds as the new blog will soon be added to the blog list. So, if you were wondering how to create a blog on Blogger, this is the simplest way to do it.

Maybe the best thing about how to create a Blogger account is that the entire process is very easy to do. Even beginners will have no problem creating and setting up an account. The customization options are plentiful here, so you shouldn't have any problem setting your account really fast!

Although the blog address will be available, you can't call that a blog unless you start writing content in there. Obviously, you will need to learn how to write a post on Blogger, and we are here to help you with that right now.

In order to start writing, you will need to click the Create a new post link or you can press the New Post button. Once you do that, you will gain immediate access to the post editor and here you can write the blog as well as make any necessary changes to content that you already wrote.

create new blogger post

Write a title for your post

Your post needs to have a title. Towards the top of the Blogger editor you will see that there is a Post title box. Add in the desired post title there. This shouldn't eat up a lot of your time, just try to come up with a post title that is enticing, very easy to use and a delight to read for your audience. A catchy title can be great. Don't opt for the clickbait title that you can see nowadays, make your title feel informative and fun to read as that's what you want. If you want to write a first post, you need to make it introductory. Write about the goals you have, the type of content you want to add and so on. It will not be easy to write down the first words, but if you create a good title it will be easier for you to translate thoughts into words!

create blogger post title

Start the writing process

You can create a Blogger post in 2 ways. You can either write the post in HTML or you can use the word processor included here. You have a button located in the top left corner which helps you switch between any of these two writing models. The HTML editor helps you create better web content and you can also use it to insert some special web functions. On the other hand, the word processor is more than qualified to offer you all the extra help you might need here.

blogger post compose html

Customizing text

If you want, you will be able to customize the text you want without a problem. You will have the ability to use the toolbar located on top of the editor to modify the text as you see fit. This includes formatting, color, size, alignment and so on. You have a Normal drop-down that helps you change the type of content you want to add, so you should consider changing between the desired heading type as you see fit. This also changes the way search engines process your content, so keep that in mind.  If possible, try to break the content into easy to read pieces. Use the Headings in a strategic manner.

blogger post heading

Add an image to your post

If you want to make your blog post enticing, you should try to add at least an image. These images make posts a lot easier to read and it's a good idea to make the most out of images if you want to share a great experience for your audience. You will have an "Insert Image" button right above your text editor, on the toolbar. There are multiple options, you can either upload them from your PC/Mac, you can share a link or you can use your webcam to take a picture if you want. However, if you link to other websites, make sure that you showcase their copyright or just refrain from doing that to begin with. There are many sites who do not agree with the idea of having their content stolen, so try to stay away from that!

insert image in Blogger post

Modify the post settings

If you look on the right side of your Post Editor, you will be able to access some Post settings. Remember that these make it easy for you to customize your post right before you choose to publish it!

blogger post settings
  • Labels are useful if you want to group multiple posts which are very similar to one another.
  • Schedule allows you to publish your content at a later date. It can come in handy if you don't want to share multiple articles at the same time.
  • Permalink is an option that allows you to select the way your post will be linked to in the future. Usually it will maintain the title structure, but there are other link types you can choose from as well.
  • Location enables you to add a location tag for your post. It's a very good tool for those that move/travel often
  • Options allows you to modify some features like the user ability to comment on a post for example. You can also choose the way your HTML code is interpreted here as well.

Previewing

A great thing about previewing your post is that you will be able to see how it looks when a reader will access it. This is the right time when you need to check your post for any errors, be it grammar or structural ones.

preview blogger post

Save the post for later

This is not the same as scheduling. When you save the post for later, it means that the post just isn't finished at this time and you will continue to work on it at a later time. You can see this as a draft for your future post.

save blogger post

Publishing the post

If you double or triple checked the post and there are no errors, then you are good to go. Still, it's a good idea to go through it at least one more time to ensure that all the content you want is there and you don't have to make any more changes. Add all the necessary labels and tags, make sure that you inserted any links, images and other information that you might need.

Once everything is ready, you will just have to press the Publish button located at the top of the panel. This is when Blogger will automatically redirect you to the Posts page. Here you will see the post right on top.

publish blogger post


Don't believe that your work is done at this point. In fact, it's far from that. You still have a long way to go before you properly optimize and improve your blog. After all, people won't be drawn in to your blog if you have just a single one to begin with. Work hard to write great posts as they will be able to make your blog stand out in the long haul.

Of course, you do need patience. Writing a good blog does require time and you shouldn't rush the content creation. Prioritize quality over quantity all the time. If you don't do that, the experience will be very well worth it in the end.

How can you expand your blog?

As we mentioned earlier, writing a single post is great but it won't draw in a lot of traffic. If you want to write a good post, one that will bring in lots of readers and views, you want to post as often as possible.

Quality content will always bring in traffic. Update the blog as often as you can. If you can share at least a post per week, you should do that. A good stream of posts will always come in handy, so make sure that you always write some good, enticing content that will help populate your blog.

If possible, we recommend you to create a post Schedule as this will help you better optimize the way you post. This way you will be able to prepare your content beforehand, so you can have it ready when you want to create a new post. The best approach is to write more than 1 post at a time. One can be posted and the others can be kept for a later date if you so desire.

create blogger posts

Write for a niche

Generalized content works but it won't really deliver good results for your audience. If you want to get the best results, we recommend you to find a niche as fast as possible. Not only does a niche help you target specific users, but it will also help you become an authority on that topic. We recommend you to research a niche and become an expert on it. This is the best way to create a large audience for a niche and from here to reaching success in blogging will be just a small step.

Don't rush the content creation process, especially if you write for a niche. Creating redundant content will just keep people away. As long as you take your time and focus on results for your audience, the experience will be an amazing one. Of course, use the proper content structure in order to cater to the needs of search engines, all while maintaining the content relevant for humans as well!

Reader interaction

Once you learn how to create a blog on Blogger you can create more than a blog in order to reach multiple audiences. But the idea here still remains, you will need to interact with the audience. The community will grow more and more as you put out content, so make sure that you always interact with the audience.

Read the comments and moderate them, make sure that you remove spam. Also, reply to people that are interested in what you write. This will help create and nurture a community around your content, which can be very interesting to do!

blogger comments

Advertising your blog

Your blog will need advertising if you want it to grow really fast. One of the best ways you can do that is by sharing it with people anywhere you can. From social networks to social media or any other location, all of these are great places where you can share your blog. We recommend you to try and do the following:
  • Post a short headline and a link to your article on Twitter
  • Single Blogger is a Google Product, make sure that you use the Google buttons in order to share on Google Plus and perform other similar actions.
  • Encourage readers and friends to share your Blogger posts on Facebook and anywhere they can. This will help you reach a large audience really fast.
  • Make sure that you comment on forums and other blogs. Link to your post there if it's meaningful for that particular topic. This type of practice is called backlinking and it's very good for SEO.

Place ads

Ads are very important if you want to monetize the blog. You won't be able to monetize your blog with AdSense unless you have a blog active for around 6 months, so keep that in mind. You also need to have at least 18 years of age and you also have to obey the TOS. AdSense allows you to receive payments based on the amount of impressions generated by your blog.

sign up for AdSense

Blog customization

You can modify just about anything you want on Blogger, it all comes down to you to make the right changes! For example, you will be able to press Layout and then you can modify the block content for each section of your blog. You also have the ability to Add a Gadget if you want. Blogger has lots of add-ons to choose from, all of which can help you better define your blog!

If you want to customize your Template, keep in mind that there are multiple customization options to choose from. You can also keep the template you have now. Programmers can press the Edit HTML button so they can modify the CSS and HTML code.

blogger template edit HTML

Stat tracking

Blogger has a dedicated option named Stats where you have the ability to monitor the blog performance. Here you have the ability to see the amount of views you get. This way you can identify what posts are performing better than others. As a result, you know what content works great for your audience in the longer term!

Learning how to create a Blogger account is really easy and you can feel free to create multiple blogs if you want. Just make sure that you write content for all of them. Plus, you can also monetize each one of your blogs if you so desire. Take your time and make sure that you provide valid information for your readers. This should be the main reason to create a Blogger account in the first place!
How to Create a Blogger Account?

Are you wondering how to create a Blogger account? Many of us do, because Blogger is one of the most popular blogging platforms out there and it can provide us with an extraordinary, fun way to express ourselves in the online world. Not only is it Blogger a very large blogging website, but it's also full of categories that you can blog on. You have complete control over what you want to blog, and that does make Blogger an amazing platform to begin with. Yet you do have to wonder how to create a blog on Blogger! We are here to help you understand all of that and so much more as fast as possible, thanks to a detailed guide that will showcase all the necessary instructions in a very easy to read manner.

how to create blogger account

Creating a Google account

What you need to know here is that Google owns Blogger, and because of that you will need to use a Google account to sign in to this platform. You can create a Google account now and then you will be able to continue to the platform without a problem. By creating a Google Account you will be able to access a wide range of Google apps and services like Drive or Mail for example. Visit the page above and share all the necessary information in order to create the necessary Google Account. Thankfully, the process is very easy and it will take only a few minutes of your time. In case you already have a Google Account, you will need to sign on the Blogger page.

create a google account

Creating your blog

Once you are located on the Blogger page, you will need to press the New Blog button in order to start a blog. You will receive a new window where you will learn how to create a Blogger account. This will enable you to share all the necessary information.
  • Make sure that you add a title for your blog in the Title area. This is very important because it will allow you to entice the visitor to read more about you and your content. So, try to make the title relevant and appealing
  • In order for users to find your blog, you will need to create an Address for it. Your blog will have a blogspot.com address, but you will need to choose what goes before blogspot.com. Basically, you can opt for something like abcdef.blogspot.com or anything like that. Remember that this can be modified in the long run. The great thing here is that you will immediately be able to see if that address is available or not. This means you will have the ability to check the address availability really fast.
  • The next step will require you to choose from any of the presets that are available at this point. Starting with a Template is a good idea, but do remember that this can be modified afterwards as well. So it's a good idea to just pick a template and move onward.
create a blogger account

Once you have the blog title, address and template ready to go, you will have to press the Create blog! button. This process will take a little bit until it's completed properly, so just wait for a few seconds as the new blog will soon be added to the blog list. So, if you were wondering how to create a blog on Blogger, this is the simplest way to do it.

Maybe the best thing about how to create a Blogger account is that the entire process is very easy to do. Even beginners will have no problem creating and setting up an account. The customization options are plentiful here, so you shouldn't have any problem setting your account really fast!

Although the blog address will be available, you can't call that a blog unless you start writing content in there. Obviously, you will need to learn how to write a post on Blogger, and we are here to help you with that right now.

In order to start writing, you will need to click the Create a new post link or you can press the New Post button. Once you do that, you will gain immediate access to the post editor and here you can write the blog as well as make any necessary changes to content that you already wrote.

create new blogger post

Write a title for your post

Your post needs to have a title. Towards the top of the Blogger editor you will see that there is a Post title box. Add in the desired post title there. This shouldn't eat up a lot of your time, just try to come up with a post title that is enticing, very easy to use and a delight to read for your audience. A catchy title can be great. Don't opt for the clickbait title that you can see nowadays, make your title feel informative and fun to read as that's what you want. If you want to write a first post, you need to make it introductory. Write about the goals you have, the type of content you want to add and so on. It will not be easy to write down the first words, but if you create a good title it will be easier for you to translate thoughts into words!

create blogger post title

Start the writing process

You can create a Blogger post in 2 ways. You can either write the post in HTML or you can use the word processor included here. You have a button located in the top left corner which helps you switch between any of these two writing models. The HTML editor helps you create better web content and you can also use it to insert some special web functions. On the other hand, the word processor is more than qualified to offer you all the extra help you might need here.

blogger post compose html

Customizing text

If you want, you will be able to customize the text you want without a problem. You will have the ability to use the toolbar located on top of the editor to modify the text as you see fit. This includes formatting, color, size, alignment and so on. You have a Normal drop-down that helps you change the type of content you want to add, so you should consider changing between the desired heading type as you see fit. This also changes the way search engines process your content, so keep that in mind.  If possible, try to break the content into easy to read pieces. Use the Headings in a strategic manner.

blogger post heading

Add an image to your post

If you want to make your blog post enticing, you should try to add at least an image. These images make posts a lot easier to read and it's a good idea to make the most out of images if you want to share a great experience for your audience. You will have an "Insert Image" button right above your text editor, on the toolbar. There are multiple options, you can either upload them from your PC/Mac, you can share a link or you can use your webcam to take a picture if you want. However, if you link to other websites, make sure that you showcase their copyright or just refrain from doing that to begin with. There are many sites who do not agree with the idea of having their content stolen, so try to stay away from that!

insert image in Blogger post

Modify the post settings

If you look on the right side of your Post Editor, you will be able to access some Post settings. Remember that these make it easy for you to customize your post right before you choose to publish it!

blogger post settings
  • Labels are useful if you want to group multiple posts which are very similar to one another.
  • Schedule allows you to publish your content at a later date. It can come in handy if you don't want to share multiple articles at the same time.
  • Permalink is an option that allows you to select the way your post will be linked to in the future. Usually it will maintain the title structure, but there are other link types you can choose from as well.
  • Location enables you to add a location tag for your post. It's a very good tool for those that move/travel often
  • Options allows you to modify some features like the user ability to comment on a post for example. You can also choose the way your HTML code is interpreted here as well.

Previewing

A great thing about previewing your post is that you will be able to see how it looks when a reader will access it. This is the right time when you need to check your post for any errors, be it grammar or structural ones.

preview blogger post

Save the post for later

This is not the same as scheduling. When you save the post for later, it means that the post just isn't finished at this time and you will continue to work on it at a later time. You can see this as a draft for your future post.

save blogger post

Publishing the post

If you double or triple checked the post and there are no errors, then you are good to go. Still, it's a good idea to go through it at least one more time to ensure that all the content you want is there and you don't have to make any more changes. Add all the necessary labels and tags, make sure that you inserted any links, images and other information that you might need.

Once everything is ready, you will just have to press the Publish button located at the top of the panel. This is when Blogger will automatically redirect you to the Posts page. Here you will see the post right on top.

publish blogger post


Don't believe that your work is done at this point. In fact, it's far from that. You still have a long way to go before you properly optimize and improve your blog. After all, people won't be drawn in to your blog if you have just a single one to begin with. Work hard to write great posts as they will be able to make your blog stand out in the long haul.

Of course, you do need patience. Writing a good blog does require time and you shouldn't rush the content creation. Prioritize quality over quantity all the time. If you don't do that, the experience will be very well worth it in the end.

How can you expand your blog?

As we mentioned earlier, writing a single post is great but it won't draw in a lot of traffic. If you want to write a good post, one that will bring in lots of readers and views, you want to post as often as possible.

Quality content will always bring in traffic. Update the blog as often as you can. If you can share at least a post per week, you should do that. A good stream of posts will always come in handy, so make sure that you always write some good, enticing content that will help populate your blog.

If possible, we recommend you to create a post Schedule as this will help you better optimize the way you post. This way you will be able to prepare your content beforehand, so you can have it ready when you want to create a new post. The best approach is to write more than 1 post at a time. One can be posted and the others can be kept for a later date if you so desire.

create blogger posts

Write for a niche

Generalized content works but it won't really deliver good results for your audience. If you want to get the best results, we recommend you to find a niche as fast as possible. Not only does a niche help you target specific users, but it will also help you become an authority on that topic. We recommend you to research a niche and become an expert on it. This is the best way to create a large audience for a niche and from here to reaching success in blogging will be just a small step.

Don't rush the content creation process, especially if you write for a niche. Creating redundant content will just keep people away. As long as you take your time and focus on results for your audience, the experience will be an amazing one. Of course, use the proper content structure in order to cater to the needs of search engines, all while maintaining the content relevant for humans as well!

Reader interaction

Once you learn how to create a blog on Blogger you can create more than a blog in order to reach multiple audiences. But the idea here still remains, you will need to interact with the audience. The community will grow more and more as you put out content, so make sure that you always interact with the audience.

Read the comments and moderate them, make sure that you remove spam. Also, reply to people that are interested in what you write. This will help create and nurture a community around your content, which can be very interesting to do!

blogger comments

Advertising your blog

Your blog will need advertising if you want it to grow really fast. One of the best ways you can do that is by sharing it with people anywhere you can. From social networks to social media or any other location, all of these are great places where you can share your blog. We recommend you to try and do the following:
  • Post a short headline and a link to your article on Twitter
  • Single Blogger is a Google Product, make sure that you use the Google buttons in order to share on Google Plus and perform other similar actions.
  • Encourage readers and friends to share your Blogger posts on Facebook and anywhere they can. This will help you reach a large audience really fast.
  • Make sure that you comment on forums and other blogs. Link to your post there if it's meaningful for that particular topic. This type of practice is called backlinking and it's very good for SEO.

Place ads

Ads are very important if you want to monetize the blog. You won't be able to monetize your blog with AdSense unless you have a blog active for around 6 months, so keep that in mind. You also need to have at least 18 years of age and you also have to obey the TOS. AdSense allows you to receive payments based on the amount of impressions generated by your blog.

sign up for AdSense

Blog customization

You can modify just about anything you want on Blogger, it all comes down to you to make the right changes! For example, you will be able to press Layout and then you can modify the block content for each section of your blog. You also have the ability to Add a Gadget if you want. Blogger has lots of add-ons to choose from, all of which can help you better define your blog!

If you want to customize your Template, keep in mind that there are multiple customization options to choose from. You can also keep the template you have now. Programmers can press the Edit HTML button so they can modify the CSS and HTML code.

blogger template edit HTML

Stat tracking

Blogger has a dedicated option named Stats where you have the ability to monitor the blog performance. Here you have the ability to see the amount of views you get. This way you can identify what posts are performing better than others. As a result, you know what content works great for your audience in the longer term!

Learning how to create a Blogger account is really easy and you can feel free to create multiple blogs if you want. Just make sure that you write content for all of them. Plus, you can also monetize each one of your blogs if you so desire. Take your time and make sure that you provide valid information for your readers. This should be the main reason to create a Blogger account in the first place!
Posted at December 24, 2020 |  by Online Ustaad

0 comments:

It can be a frustrating experience when you find your Gmail account is no longer active. Having your Gmail account disabled means losing access to the products by Google that were linked. There are several reasons why your account may have been ended that are mostly due to the Terms of Service policies by Google itself. So, if you have violated one more of the polices either intentionally or not, you can find yourself with a disabled Gmail account.

Adding to the frustration is that Google will often disable the account with no warning. However, the good news is that there are simple methods for getting your account back online.

get disabled gmail account back

Gmail Account Temporarily Disabled

This is generally the easiest to overcome as Google believes that your account may be compromised. To rectify the situation, you will be asked to provide your mobile number or recover email identification. If you do either, they will send you a text message that will allow you to access your account quickly. You will need to do so within a 48-hour period otherwise it will become more difficult to get back your account.

Gmail Account Disabled Due To Perceived ToS Violation

If your Gmail account disabled included a terms of service (ToS) violation warning, then you will need to fill out their contact form so the process of getting your Gmail account back can begin. You should read the ToS thoroughly so that the violation will not happen again and provide the email address. If you do not get a response, repeat the step every two days until you do.

gmail account disabled
Gmail account disabled - Google contact form screenshot

Once they have responded, the next step should be to get your Gmail back so that you can gain automatic access to all the Google products including AdSense. You can also visit the help forum where you can open a 'Gmail account disabled' topic. Just focus on the Gmail account itself first as that is the key to the rest of your Google services. You'll want to discuss the issues that you are facing and why this needs to be resolved as quickly as possible. If the Top Contributor pings your thread to the staff at Google, then you should expect your account to be back online in 48 hours or two business days.

Gmail Account Disabled Due To Serious ToS Violations

If the Gmail account disabled was due to a serious violation of the Terms of Service agreement, as well as the Google policies that oversee your account, then you will have considerable difficulty in getting your account back. Such violations would include your AdSense account being involved in click fraud, for example. Serious violations that are clear will make it virtually impossible for your account to be restored.

If what happened was not considered a serious violation, then you should be able to get your account up and running within 24 to 48 hours depending on the circumstances. It pays however, to keep all your important data and information outside of your Google accounts in case of getting a Gmail account disabled result. By protecting yourself, the impact will be easier to handle until you can get your account back online.

How to Get a Disabled Gmail Account Back

It can be a frustrating experience when you find your Gmail account is no longer active. Having your Gmail account disabled means losing access to the products by Google that were linked. There are several reasons why your account may have been ended that are mostly due to the Terms of Service policies by Google itself. So, if you have violated one more of the polices either intentionally or not, you can find yourself with a disabled Gmail account.

Adding to the frustration is that Google will often disable the account with no warning. However, the good news is that there are simple methods for getting your account back online.

get disabled gmail account back

Gmail Account Temporarily Disabled

This is generally the easiest to overcome as Google believes that your account may be compromised. To rectify the situation, you will be asked to provide your mobile number or recover email identification. If you do either, they will send you a text message that will allow you to access your account quickly. You will need to do so within a 48-hour period otherwise it will become more difficult to get back your account.

Gmail Account Disabled Due To Perceived ToS Violation

If your Gmail account disabled included a terms of service (ToS) violation warning, then you will need to fill out their contact form so the process of getting your Gmail account back can begin. You should read the ToS thoroughly so that the violation will not happen again and provide the email address. If you do not get a response, repeat the step every two days until you do.

gmail account disabled
Gmail account disabled - Google contact form screenshot

Once they have responded, the next step should be to get your Gmail back so that you can gain automatic access to all the Google products including AdSense. You can also visit the help forum where you can open a 'Gmail account disabled' topic. Just focus on the Gmail account itself first as that is the key to the rest of your Google services. You'll want to discuss the issues that you are facing and why this needs to be resolved as quickly as possible. If the Top Contributor pings your thread to the staff at Google, then you should expect your account to be back online in 48 hours or two business days.

Gmail Account Disabled Due To Serious ToS Violations

If the Gmail account disabled was due to a serious violation of the Terms of Service agreement, as well as the Google policies that oversee your account, then you will have considerable difficulty in getting your account back. Such violations would include your AdSense account being involved in click fraud, for example. Serious violations that are clear will make it virtually impossible for your account to be restored.

If what happened was not considered a serious violation, then you should be able to get your account up and running within 24 to 48 hours depending on the circumstances. It pays however, to keep all your important data and information outside of your Google accounts in case of getting a Gmail account disabled result. By protecting yourself, the impact will be easier to handle until you can get your account back online.

Posted at December 24, 2020 |  by Online Ustaad

0 comments:

Tuesday, December 22, 2020

It is becoming increasingly important to make our posts appreciated and shared on social networks and one of the best ways to get traffic to our blog or site and boost sharing stats is to add social sharing buttons.

In this tutorial we will see how to add a floating social media sharing bar below the title of Blogger posts, so when a reader scrolls down the page, he will still be able to see the sharing buttons without having to scroll back to the top.

floating social media for blogger
Adding the below jQuery script will make the buttons float in a fixed position as soon as they reach "the top" of the page. By scrolling back, the buttons will return to their initial position. The social sharing bar includes buttons for Facebook, Twitter, Google+, and Pinterest.

Social Media Sharing Buttons below Blogger Post Title

  1. From the Blogger Dashboard, go to "Template" and click on the "Edit HTML" button:

  2. Click anywhere inside the code area and press the CTRL + F keys to open the search box. Once you see the search box, type the </head> tag inside the search box and hit Enter to find it.

    blogger search box, ctrl + f
  3. Just above </head> add this script:
    <script src='http://ajax.googleapis.com/ajax/libs/jquery/1.7.1/jquery.min.js' type='text/javascript'/>

    <script type='text/javascript'>
    //<![CDATA[
    $(function() {
    var $movesbuttons = $("#floating-social-buttons"),
    $window = $(window),
    offset = $movesbuttons.offset();
    $window.scroll(function() {
    if ($window.scrollTop() > offset.top) {
    $movesbuttons.css({'position' : 'fixed', 'width' : '550px', 'top' : '0px'});
    } else {
    $movesbuttons.css({'position' : 'absolute', 'top' : 'auto'});
    }
    });
    });
    //]]>
    </script>
  4. Now before the ]]></b:skin> tag (press CTRL + F to find it) add the following CSS styles:
    #floating-social-buttons {
    padding: 6px 0px 12px;
    position: absolute;
    background: #F6F6F6;
    border-bottom: 1px solid #DEDEDE;
    width: 550px;
    height: 18px;
    z-index: 99;
    }
    .floating-social-buttons {
    margin-left: 5px !important;
    }
    .floating-social-buttons li {
    float: left;
    margin-left: 5px;
    list-style:none;
    }
    To change the width of the bar, modify the 550px values in red. Note that this value also appears in the script which also needs to be modified
  5. Finally, just below the second <div class='post-header'> (press CTRL + F and hit Enter twice to find the second one) add the following code:
    <b:if cond='data:blog.pageType == &quot;item&quot;'>
    <div style='padding:5px 0 35px 0;clear:both;'>
    <div id='floating-social-buttons'>
    <ul class='floating-social-buttons'>

    <li><iframe allowTransparency='true' expr:src='&quot;http://www.facebook.com/plugins/like.php?href=&quot; + data:post.url+ &quot;&amp;layout=button_count&amp;show_faces=false&amp;width=100&amp;height=25&amp;action=like&amp;font=tahoma&amp;colorscheme=light&quot;' frameborder='0' scrolling='no' style='border:none; overflow:hidden; width:100px; height:25px;'/></li>

    <li><a class='twitter-share-button' data-lang='en' href='https://twitter.com/share'>Tweet</a><script src='//platform.twitter.com/widgets.js' type='text/javascript'/></li>

    <li><script src='http://apis.google.com/js/plusone.js' type='text/javascript'/><g:plusone expr:href='data:post.url' size='medium'/></li>

    <li><a class='pin-it-button' count-layout='horizontal' expr:href='&quot;http://pinterest.com/pin/create/button/?url=&quot; + data:post.url + &quot;&amp;media=&quot; + data:post.thumbnailUrl + &quot;&amp;description=&quot; + data:post.snippet' style='margin:0 10px 5px 0;'>Pin It</a> <script src='http://assets.pinterest.com/js/pinit.js' type='text/javascript'/></li>

    </ul>
    </div>
    </div>
    </b:if>
  6. Click on the "Save template" button and you're done :)

Customizing the Floating Social Media Sharing buttons

  • If you want the buttons to appear at the end of the post, paste this code before or after <div class='post-footer'>
  • If the bar overlaps with the post content, then change 35px to a higher value.
So these were the steps for adding the horizontal social buttons bar on Blogger. Using this bar it is also useful as it could help you to get more social traffic for your blog.

Add floating social media sharing buttons below Blogger post titles

It is becoming increasingly important to make our posts appreciated and shared on social networks and one of the best ways to get traffic to our blog or site and boost sharing stats is to add social sharing buttons.

In this tutorial we will see how to add a floating social media sharing bar below the title of Blogger posts, so when a reader scrolls down the page, he will still be able to see the sharing buttons without having to scroll back to the top.

floating social media for blogger
Adding the below jQuery script will make the buttons float in a fixed position as soon as they reach "the top" of the page. By scrolling back, the buttons will return to their initial position. The social sharing bar includes buttons for Facebook, Twitter, Google+, and Pinterest.

Social Media Sharing Buttons below Blogger Post Title

  1. From the Blogger Dashboard, go to "Template" and click on the "Edit HTML" button:

  2. Click anywhere inside the code area and press the CTRL + F keys to open the search box. Once you see the search box, type the </head> tag inside the search box and hit Enter to find it.

    blogger search box, ctrl + f
  3. Just above </head> add this script:
    <script src='http://ajax.googleapis.com/ajax/libs/jquery/1.7.1/jquery.min.js' type='text/javascript'/>

    <script type='text/javascript'>
    //<![CDATA[
    $(function() {
    var $movesbuttons = $("#floating-social-buttons"),
    $window = $(window),
    offset = $movesbuttons.offset();
    $window.scroll(function() {
    if ($window.scrollTop() > offset.top) {
    $movesbuttons.css({'position' : 'fixed', 'width' : '550px', 'top' : '0px'});
    } else {
    $movesbuttons.css({'position' : 'absolute', 'top' : 'auto'});
    }
    });
    });
    //]]>
    </script>
  4. Now before the ]]></b:skin> tag (press CTRL + F to find it) add the following CSS styles:
    #floating-social-buttons {
    padding: 6px 0px 12px;
    position: absolute;
    background: #F6F6F6;
    border-bottom: 1px solid #DEDEDE;
    width: 550px;
    height: 18px;
    z-index: 99;
    }
    .floating-social-buttons {
    margin-left: 5px !important;
    }
    .floating-social-buttons li {
    float: left;
    margin-left: 5px;
    list-style:none;
    }
    To change the width of the bar, modify the 550px values in red. Note that this value also appears in the script which also needs to be modified
  5. Finally, just below the second <div class='post-header'> (press CTRL + F and hit Enter twice to find the second one) add the following code:
    <b:if cond='data:blog.pageType == &quot;item&quot;'>
    <div style='padding:5px 0 35px 0;clear:both;'>
    <div id='floating-social-buttons'>
    <ul class='floating-social-buttons'>

    <li><iframe allowTransparency='true' expr:src='&quot;http://www.facebook.com/plugins/like.php?href=&quot; + data:post.url+ &quot;&amp;layout=button_count&amp;show_faces=false&amp;width=100&amp;height=25&amp;action=like&amp;font=tahoma&amp;colorscheme=light&quot;' frameborder='0' scrolling='no' style='border:none; overflow:hidden; width:100px; height:25px;'/></li>

    <li><a class='twitter-share-button' data-lang='en' href='https://twitter.com/share'>Tweet</a><script src='//platform.twitter.com/widgets.js' type='text/javascript'/></li>

    <li><script src='http://apis.google.com/js/plusone.js' type='text/javascript'/><g:plusone expr:href='data:post.url' size='medium'/></li>

    <li><a class='pin-it-button' count-layout='horizontal' expr:href='&quot;http://pinterest.com/pin/create/button/?url=&quot; + data:post.url + &quot;&amp;media=&quot; + data:post.thumbnailUrl + &quot;&amp;description=&quot; + data:post.snippet' style='margin:0 10px 5px 0;'>Pin It</a> <script src='http://assets.pinterest.com/js/pinit.js' type='text/javascript'/></li>

    </ul>
    </div>
    </div>
    </b:if>
  6. Click on the "Save template" button and you're done :)

Customizing the Floating Social Media Sharing buttons

  • If you want the buttons to appear at the end of the post, paste this code before or after <div class='post-footer'>
  • If the bar overlaps with the post content, then change 35px to a higher value.
So these were the steps for adding the horizontal social buttons bar on Blogger. Using this bar it is also useful as it could help you to get more social traffic for your blog.

Posted at December 22, 2020 |  by Online Ustaad

0 comments:

AddThis is the most complete social sharing service allowing you to share your posts in more than 270 different social networks. If you want to use the AddThis widget and get the AddThis sharing buttons, this tutorial will show you how to register and add this feature on your blog. Plus, you will get to know some of the customization options of these buttons. So let's get started!

Getting the AddThis share buttons code

Step 1. Visit the https://www.addthis.com/get/sharing page.

Step 2. To get the sharing buttons and to access the AddThis sharing stats to find out how many people shared your post by using the AddThis feature, click on the "Create account" button.

create addthis account

The site will ask you to make a small registration. Fill out the information to register. It's quick, simple and it's free. To finish the registration, click on the Register button.

register addthis

Step 3. After you've been logged in, right below the "Get sharing buttons for", choose the "A website" option.

addthis share buttons

Step 4. In the "Select style" section, choose the buttons style that you think would look the best on your site/blog. Please note that on the right side you can see a preview of these buttons.

addthis sharing buttons

Step 5. After you have chosen the style, the site will provide a code - click on the "Grab it" button to copy it.

addthis code

The code provided will look like this:
<!-- AddThis Button BEGIN -->
<div class="addthis_toolbox addthis_default_style ">
<a class="addthis_button_facebook_like" fb:like:layout="button_count"></a>
<a class="addthis_button_tweet"></a>
<a class="addthis_button_pinterest_pinit" pi:pinit:layout="horizontal"></a>
<a class="addthis_counter addthis_pill_style"></a>
</div>
<script type="text/javascript">var addthis_config = {"data_track_addressbar":true};</script>
<script type="text/javascript" src="//s7.addthis.com/js/300/addthis_widget.js#pubid=ra-XXXXXXXXXXX"></script>
<!-- AddThis Button END -->
Now that you have selected and set up your AddThis sharing buttons, let's add them in the footer of the posts.

Adding the AddThis sharing buttons on Blogger

Step 1. Access your Blogger Dashboard and go to "Template", then click on the "Edit HTML" button on the right side:

blogger template

Step 2. Click anywhere inside the code area and press the CTRL + F keys to open the search box.

Step 3. Type the following line inside the search box and try to find the second occurrence of it - hit Enter:
<div class='post-footer'>
Step 4. Just above this line, add the code for the AddThis social sharing buttons.

Note: If you want to add at the beginning of your posts, add the code below the second:
<div class='post-header'>

How to add more AddThis buttons

To add more buttons, simply choose the button for that social network and add the code just before the </div> tag (refer to the step 5 from above).

Some examples:
<a class="addthis_button_linkedin"></a> /* linkedin button */
<a class="addthis_button_google_plusone" g:plusone:size="medium"></a> /*gplus button */

<a class="addthis_button_digg"></a> /* digg button */

<a class="addthis_button_stumbleupon"></a> /* stumbleupon button */
<a class="addthis_button_print"></a> /* print button */

CSS3 AddThis Share Buttons

You can add just a single button, so that when the reader hovers over it, a menu will open with the options of social networks to share the post.

css3 share buttons, addthis

Visit this page for a demo.

Step 1. Go to "Template" > click on the "Edit HTML" button > press the CTRL + F keys and search:
<div class='post-footer'>
Just above this line, paste the following code:
<style type='text/css'>
.addthis_share_btn a, .addthis_share_btn a:visited {
background: #FF5C00; /* background color of the button */
display: inline-block;
padding: 6px 12px;
font-family: arial,helvetica,lucida,verdana,sans-serif;
font-size: 12px;
line-height: 1em;
color: #fff;
text-decoration: none;
-moz-border-radius: 5px;
-webkit-border-radius: 5px;
-moz-box-shadow: 0 1px 3px rgba(0,0,0,0.5);
-webkit-box-shadow: 0 1px 3px rgba(0,0,0,0.5);
border-radius: 5px;
box-shadow: 0 1px 3px rgba(0,0,0,0.5);
text-shadow: 0 -1px 1px rgba(0,0,0,0.25);
border-bottom: 1px solid rgba(0,0,0,0.25);
position: relative;
cursor: pointer;
}
.addthis_share_btn a:hover {
background: #D45500; /* background color on mouse hover */
color: #fff;
}
.addthis_share_btn a:active { top: 1px; }

.addthis_share_btn a span, .addthis_share_btn:visited a span {
background: url(http://www.addthis.com/cms-content/images/gallery/icon-addthis.gif) no-repeat left;
padding: 1px 0 1px 18px;
}
</style>
<!-- AddThis Share Button -->
<div class='addthis_toolbox addthis_share_btn'>
<a class='addthis_button_compact' href='http://addthis.com/bookmark.php'>
<span>Share</span></a>
</div>
<script src='http://s7.addthis.com/js/250/addthis_widget.js' type='text/javascript'/>
<!-- End AddThis Share Button -->

Customization

  • To change the color of the button according to the colors of your template, modify the color value in red.
  • If you want to change the "Share" text, replace the text in blue.
Step 2. Save the changes by clicking on the "Save template" button and you're done!

Share Blog Posts in Social Media using AddThis

AddThis is the most complete social sharing service allowing you to share your posts in more than 270 different social networks. If you want to use the AddThis widget and get the AddThis sharing buttons, this tutorial will show you how to register and add this feature on your blog. Plus, you will get to know some of the customization options of these buttons. So let's get started!

Getting the AddThis share buttons code

Step 1. Visit the https://www.addthis.com/get/sharing page.

Step 2. To get the sharing buttons and to access the AddThis sharing stats to find out how many people shared your post by using the AddThis feature, click on the "Create account" button.

create addthis account

The site will ask you to make a small registration. Fill out the information to register. It's quick, simple and it's free. To finish the registration, click on the Register button.

register addthis

Step 3. After you've been logged in, right below the "Get sharing buttons for", choose the "A website" option.

addthis share buttons

Step 4. In the "Select style" section, choose the buttons style that you think would look the best on your site/blog. Please note that on the right side you can see a preview of these buttons.

addthis sharing buttons

Step 5. After you have chosen the style, the site will provide a code - click on the "Grab it" button to copy it.

addthis code

The code provided will look like this:
<!-- AddThis Button BEGIN -->
<div class="addthis_toolbox addthis_default_style ">
<a class="addthis_button_facebook_like" fb:like:layout="button_count"></a>
<a class="addthis_button_tweet"></a>
<a class="addthis_button_pinterest_pinit" pi:pinit:layout="horizontal"></a>
<a class="addthis_counter addthis_pill_style"></a>
</div>
<script type="text/javascript">var addthis_config = {"data_track_addressbar":true};</script>
<script type="text/javascript" src="//s7.addthis.com/js/300/addthis_widget.js#pubid=ra-XXXXXXXXXXX"></script>
<!-- AddThis Button END -->
Now that you have selected and set up your AddThis sharing buttons, let's add them in the footer of the posts.

Adding the AddThis sharing buttons on Blogger

Step 1. Access your Blogger Dashboard and go to "Template", then click on the "Edit HTML" button on the right side:

blogger template

Step 2. Click anywhere inside the code area and press the CTRL + F keys to open the search box.

Step 3. Type the following line inside the search box and try to find the second occurrence of it - hit Enter:
<div class='post-footer'>
Step 4. Just above this line, add the code for the AddThis social sharing buttons.

Note: If you want to add at the beginning of your posts, add the code below the second:
<div class='post-header'>

How to add more AddThis buttons

To add more buttons, simply choose the button for that social network and add the code just before the </div> tag (refer to the step 5 from above).

Some examples:
<a class="addthis_button_linkedin"></a> /* linkedin button */
<a class="addthis_button_google_plusone" g:plusone:size="medium"></a> /*gplus button */

<a class="addthis_button_digg"></a> /* digg button */

<a class="addthis_button_stumbleupon"></a> /* stumbleupon button */
<a class="addthis_button_print"></a> /* print button */

CSS3 AddThis Share Buttons

You can add just a single button, so that when the reader hovers over it, a menu will open with the options of social networks to share the post.

css3 share buttons, addthis

Visit this page for a demo.

Step 1. Go to "Template" > click on the "Edit HTML" button > press the CTRL + F keys and search:
<div class='post-footer'>
Just above this line, paste the following code:
<style type='text/css'>
.addthis_share_btn a, .addthis_share_btn a:visited {
background: #FF5C00; /* background color of the button */
display: inline-block;
padding: 6px 12px;
font-family: arial,helvetica,lucida,verdana,sans-serif;
font-size: 12px;
line-height: 1em;
color: #fff;
text-decoration: none;
-moz-border-radius: 5px;
-webkit-border-radius: 5px;
-moz-box-shadow: 0 1px 3px rgba(0,0,0,0.5);
-webkit-box-shadow: 0 1px 3px rgba(0,0,0,0.5);
border-radius: 5px;
box-shadow: 0 1px 3px rgba(0,0,0,0.5);
text-shadow: 0 -1px 1px rgba(0,0,0,0.25);
border-bottom: 1px solid rgba(0,0,0,0.25);
position: relative;
cursor: pointer;
}
.addthis_share_btn a:hover {
background: #D45500; /* background color on mouse hover */
color: #fff;
}
.addthis_share_btn a:active { top: 1px; }

.addthis_share_btn a span, .addthis_share_btn:visited a span {
background: url(http://www.addthis.com/cms-content/images/gallery/icon-addthis.gif) no-repeat left;
padding: 1px 0 1px 18px;
}
</style>
<!-- AddThis Share Button -->
<div class='addthis_toolbox addthis_share_btn'>
<a class='addthis_button_compact' href='http://addthis.com/bookmark.php'>
<span>Share</span></a>
</div>
<script src='http://s7.addthis.com/js/250/addthis_widget.js' type='text/javascript'/>
<!-- End AddThis Share Button -->

Customization

  • To change the color of the button according to the colors of your template, modify the color value in red.
  • If you want to change the "Share" text, replace the text in blue.
Step 2. Save the changes by clicking on the "Save template" button and you're done!

Posted at December 22, 2020 |  by Online Ustaad

0 comments:

One of the best gadgets for your Blogger blog is a popular posts widget for your sidebar. This lets visitors see what your trending posts are right now and encourages them to click on them to read them. This basic widget is just a little too basic, however, for the modern day website visitor. Not only do they want to see your trending posts, but they also want to join the discussions that are happening on your blog. To do that, you'll need a most commented posts widget for Blogger.

Having a customized widget on your site is a lot easier than you might think. In order to have an effective widget, however, you're going to need a few specific things to help you out.

most commented posts widget


Here's What You're Going To Get

There are certain aspects in the design of a most commented posts widget that you should expect. That's why you'll find these specific components with this custom widget:
  • Ordered by popularity. The posts that have the most comments are the most likely to have visitors want to read the post and join in with the conversation. By ordering your posts based on the popularity of them, you'll give each visitor the chance to see what the hype really is about! This lets you have a charted graphic that gives a visitor easy recognition, but also allows you to keep it straight and aligned if you're looking for a cleaner look.
  • Graphic incorporation. Blog posts that have at least one graphic incorporated with them will receive 100% more traffic than posts that have no images at all. For every graphic that you include with a blog post, the more likely you are to get a click! The same is true with your most commented posts widget, so be sure to incorporate graphics that stand out with your design.
  • Descriptions that blend in. The internet today revolves around the value that you can provide each individual user. People don't just click on things because they look visually tempting. They click on them because they promise a level of value that another website like yours isn't able to provide. By having descriptions that blend in, you'll be able to enhance the perceived value that your site can provide. This leads to more clicks!

Add the Most Commented Posts Widget to Blogger

Step 1. Log in to your Blogger account and go to Template, press the "Edit HTML" button.

Step 2. Click anywhere inside the code area and press the CTRL + F keys to open the Blogger' search box. Type the following tag inside it and hit Enter to find it:
</Group>
Step 3. Just below </Group>, add this code:
<Group description="Most Commented" selector=".most-commented">
<Variable name="most.commented.background1" description="background color1" type="color" default="#fa4242" value="#ee377a"/>

<Variable name="most.commented.background2" description="background color2" type="color" default="#ee6107" value="#fcad37"/>
<Variable name="most.commented.background3" description="background color3" type="color" default="#f0f" value="#f8e000"/>
<Variable name="most.commented.background4" description="background color4" type="color" default="#ff0" value="#c7e93d"/>
<Variable name="most.commented.background5" description="background color5" type="color" default="#0ff" value="#5ebded"/>
</Group>

add code to blogger html
Note: if you can't find the </Group> tag, try to find the following tag instead and add the variables just below it:
<b:skin><![CDATA[

Step 4. Now search for the following tag (CTRL + F):
]]></b:skin>
Step 5. And just above it, add this CSS code:
.comment-count {
    padding: 3px 10px;
    background: #fff;
    color: #000;
    font-size: 10px;
    float: right;
}

.most-commented ul {
    padding: 0px !important;
    font-family: Century Gothic, sans-serif;
}

.most-commented ul li {
    list-style-type: none;
    padding: 10px;
    color: #555;
    margin-top: -10px;
}

.most-commented ul li a {
    color: #444;
    font-weight: bold;
    text-decoration: none;
    font-size: 11px;
}

.most-commented ul li img {
    float: left;
    margin: 0px 5px 0px 0px;
    width: 60px;
    height: 60px;
}

.most-commented:nth-child(3n+0) {
    background: $(most.commented.background1);
    width: 100%;
}

.most-commented:nth-child(4n+0) {
    background: $(most.commented.background2);
    width: 95%;
}

.most-commented:nth-child(5n+0) {
    background: $(most.commented.background3);
    width: 90%;
}

.most-commented:nth-child(6n+0) {
    background: $(most.commented.background4);
    width: 85%;
}

.most-commented:nth-child(7n+0) {
    background: $(most.commented.background5);
    width: 80%;
}
Step 6. Save the template.

Now, let's add the Most Commented Posts widget to the Layout of our Blogger blog. Head over to the "Layout" section of your Blogger dashboard and click on the "Add a gadget" link on the right side. From the pop-up window, scroll down the list and select the "HTML/JavaScript" gadget:

blogger html javascript gadget

Copy and paste this script inside the content box:
<script type="text/javascript">
function stripTags(s,n) {
    return s.replace(/<.*?>/ig,"").split(/\s+/).slice(0,n-1).join(" ")
}
function mostcommented(feed) {
    var i;
    for (i = 0; i < feed.count ; i++) {
var postURL = "'" + feed.value.items[i].link + "'";
var postTitle = feed.value.items[i].title;
var postthumbnail = "<img src="+feed.value.items[i].postthumbnail+" />";
var postDescription = feed.value.items[i].postdescription;
var postComments = feed.value.items[i].commentcount;
var postList = '<div class="most-commented"><ul><li><div class="comment-count">' + postComments + "</div>" + postthumbnail + "<a href="+ postURL + '">' + postTitle + "</a>"  + '<p>' +stripTags(postDescription,10)+'...</p>' + '</li></ul></div>';
 document.write(postList);
     }
 }
 </script>
<script src="http://pipes.yahoo.com/pipes/pipe.run?
AddUrlHere=http://helplogger.blogspot.com
&NumberofPosts=5
&_id=2cb5eb603ed55a6264ee1484e5fdd45c
&_callback=mostcommented
&_render=json"
type="text/javascript"></script><span style="font-size: 80%; float:left;"><a href="http://helplogger.blogspot.com/2014/08/most-commented-posts-blogger-widget.html">Add this widget</a></span>
Here, change http://helplogger.blogspot.com with your blog URL. If you want to add more characters to the description, modify the "10" value in red from "postDescription,10".


If you want a more simple look (without the thumbnails and post snippets), add this script instead:
<script type="text/javascript">
function stripTags(s,n)
    {
    return s.replace(/<.*?>/ig,"").split(/\s+/).slice(0,n-1).join(" ")
}
function mostcommented(feed) {
 var i;
 for (i = 0; i < feed.count ; i++)
 {
var postURL = "'" + feed.value.items[i].link + "'";
var postTitle = feed.value.items[i].title;
var postComments = feed.value.items[i].commentcount;
var postList = '<div class="most-commented"><ul><li style="margin-bottom: 10px"><div class="comment-count">' + postComments + "</div>" + "<a href="+ postURL + '">' + postTitle + "</a>"  + '</li></ul></div>';
 document.write(postList);
 }
 }
 </script>
<script src="http://pipes.yahoo.com/pipes/pipe.run?
 AddUrlHere=http://helplogger.blogspot.com
&NumberofPosts=5
&_id=2cb5eb603ed55a6264ee1484e5fdd45c
&_callback=mostcommented
&_render=json"
type="text/javascript"></script>
<span style="font-size: 80%; float:left;"><a href="http://helplogger.blogspot.com/2014/08/most-commented-posts-blogger-widget.html">Add this widget</a></span>
.... and replace http://helplogger.blogspot.com with your address.
To add the "comments" text after the comments number, replace the line in red:
<div class="comment-count">' + postComments + "</div>"
with:
<div class="comment-count">' + postComments + " comments" + "</div>"
Once you have finished adding your own settings, press the "Save" button to enable the gadget in the sidebar of your blog. That's it!

configure html javascript gadget

To change the background colors of the most commented posts, go to "Template" > hit the "Customize" button and navigate to "Advanced" > "Most Commented" tab. Here you can pick 5 different colors by clicking on the color boxes:

blogger template designer

Once you've selected your favorite color scheme, click the "Apply to blog" button to save the changes... and you're done.

Why Use the Most Commented Posts widget?

The basic psychology in every human is that they want to feel like they belong to a community. That's exactly what this customized widget will bring to your site. No matter what content drew a visitor to see your content, this widget will invite them to join the lively parts of your piece of the internet. This helps to build relationships, with you and with other visitors, and this relationship-building engagement is what you need to start having real value.

Take the time to install this most commented posts widget on your site and you'll see for yourself why this is one of the most useful widgets that is available right now. Enjoy ;)

How to Display Most Commented Posts in Blogger

One of the best gadgets for your Blogger blog is a popular posts widget for your sidebar. This lets visitors see what your trending posts are right now and encourages them to click on them to read them. This basic widget is just a little too basic, however, for the modern day website visitor. Not only do they want to see your trending posts, but they also want to join the discussions that are happening on your blog. To do that, you'll need a most commented posts widget for Blogger.

Having a customized widget on your site is a lot easier than you might think. In order to have an effective widget, however, you're going to need a few specific things to help you out.

most commented posts widget


Here's What You're Going To Get

There are certain aspects in the design of a most commented posts widget that you should expect. That's why you'll find these specific components with this custom widget:
  • Ordered by popularity. The posts that have the most comments are the most likely to have visitors want to read the post and join in with the conversation. By ordering your posts based on the popularity of them, you'll give each visitor the chance to see what the hype really is about! This lets you have a charted graphic that gives a visitor easy recognition, but also allows you to keep it straight and aligned if you're looking for a cleaner look.
  • Graphic incorporation. Blog posts that have at least one graphic incorporated with them will receive 100% more traffic than posts that have no images at all. For every graphic that you include with a blog post, the more likely you are to get a click! The same is true with your most commented posts widget, so be sure to incorporate graphics that stand out with your design.
  • Descriptions that blend in. The internet today revolves around the value that you can provide each individual user. People don't just click on things because they look visually tempting. They click on them because they promise a level of value that another website like yours isn't able to provide. By having descriptions that blend in, you'll be able to enhance the perceived value that your site can provide. This leads to more clicks!

Add the Most Commented Posts Widget to Blogger

Step 1. Log in to your Blogger account and go to Template, press the "Edit HTML" button.

Step 2. Click anywhere inside the code area and press the CTRL + F keys to open the Blogger' search box. Type the following tag inside it and hit Enter to find it:
</Group>
Step 3. Just below </Group>, add this code:
<Group description="Most Commented" selector=".most-commented">
<Variable name="most.commented.background1" description="background color1" type="color" default="#fa4242" value="#ee377a"/>

<Variable name="most.commented.background2" description="background color2" type="color" default="#ee6107" value="#fcad37"/>
<Variable name="most.commented.background3" description="background color3" type="color" default="#f0f" value="#f8e000"/>
<Variable name="most.commented.background4" description="background color4" type="color" default="#ff0" value="#c7e93d"/>
<Variable name="most.commented.background5" description="background color5" type="color" default="#0ff" value="#5ebded"/>
</Group>

add code to blogger html
Note: if you can't find the </Group> tag, try to find the following tag instead and add the variables just below it:
<b:skin><![CDATA[

Step 4. Now search for the following tag (CTRL + F):
]]></b:skin>
Step 5. And just above it, add this CSS code:
.comment-count {
    padding: 3px 10px;
    background: #fff;
    color: #000;
    font-size: 10px;
    float: right;
}

.most-commented ul {
    padding: 0px !important;
    font-family: Century Gothic, sans-serif;
}

.most-commented ul li {
    list-style-type: none;
    padding: 10px;
    color: #555;
    margin-top: -10px;
}

.most-commented ul li a {
    color: #444;
    font-weight: bold;
    text-decoration: none;
    font-size: 11px;
}

.most-commented ul li img {
    float: left;
    margin: 0px 5px 0px 0px;
    width: 60px;
    height: 60px;
}

.most-commented:nth-child(3n+0) {
    background: $(most.commented.background1);
    width: 100%;
}

.most-commented:nth-child(4n+0) {
    background: $(most.commented.background2);
    width: 95%;
}

.most-commented:nth-child(5n+0) {
    background: $(most.commented.background3);
    width: 90%;
}

.most-commented:nth-child(6n+0) {
    background: $(most.commented.background4);
    width: 85%;
}

.most-commented:nth-child(7n+0) {
    background: $(most.commented.background5);
    width: 80%;
}
Step 6. Save the template.

Now, let's add the Most Commented Posts widget to the Layout of our Blogger blog. Head over to the "Layout" section of your Blogger dashboard and click on the "Add a gadget" link on the right side. From the pop-up window, scroll down the list and select the "HTML/JavaScript" gadget:

blogger html javascript gadget

Copy and paste this script inside the content box:
<script type="text/javascript">
function stripTags(s,n) {
    return s.replace(/<.*?>/ig,"").split(/\s+/).slice(0,n-1).join(" ")
}
function mostcommented(feed) {
    var i;
    for (i = 0; i < feed.count ; i++) {
var postURL = "'" + feed.value.items[i].link + "'";
var postTitle = feed.value.items[i].title;
var postthumbnail = "<img src="+feed.value.items[i].postthumbnail+" />";
var postDescription = feed.value.items[i].postdescription;
var postComments = feed.value.items[i].commentcount;
var postList = '<div class="most-commented"><ul><li><div class="comment-count">' + postComments + "</div>" + postthumbnail + "<a href="+ postURL + '">' + postTitle + "</a>"  + '<p>' +stripTags(postDescription,10)+'...</p>' + '</li></ul></div>';
 document.write(postList);
     }
 }
 </script>
<script src="http://pipes.yahoo.com/pipes/pipe.run?
AddUrlHere=http://helplogger.blogspot.com
&NumberofPosts=5
&_id=2cb5eb603ed55a6264ee1484e5fdd45c
&_callback=mostcommented
&_render=json"
type="text/javascript"></script><span style="font-size: 80%; float:left;"><a href="http://helplogger.blogspot.com/2014/08/most-commented-posts-blogger-widget.html">Add this widget</a></span>
Here, change http://helplogger.blogspot.com with your blog URL. If you want to add more characters to the description, modify the "10" value in red from "postDescription,10".


If you want a more simple look (without the thumbnails and post snippets), add this script instead:
<script type="text/javascript">
function stripTags(s,n)
    {
    return s.replace(/<.*?>/ig,"").split(/\s+/).slice(0,n-1).join(" ")
}
function mostcommented(feed) {
 var i;
 for (i = 0; i < feed.count ; i++)
 {
var postURL = "'" + feed.value.items[i].link + "'";
var postTitle = feed.value.items[i].title;
var postComments = feed.value.items[i].commentcount;
var postList = '<div class="most-commented"><ul><li style="margin-bottom: 10px"><div class="comment-count">' + postComments + "</div>" + "<a href="+ postURL + '">' + postTitle + "</a>"  + '</li></ul></div>';
 document.write(postList);
 }
 }
 </script>
<script src="http://pipes.yahoo.com/pipes/pipe.run?
 AddUrlHere=http://helplogger.blogspot.com
&NumberofPosts=5
&_id=2cb5eb603ed55a6264ee1484e5fdd45c
&_callback=mostcommented
&_render=json"
type="text/javascript"></script>
<span style="font-size: 80%; float:left;"><a href="http://helplogger.blogspot.com/2014/08/most-commented-posts-blogger-widget.html">Add this widget</a></span>
.... and replace http://helplogger.blogspot.com with your address.
To add the "comments" text after the comments number, replace the line in red:
<div class="comment-count">' + postComments + "</div>"
with:
<div class="comment-count">' + postComments + " comments" + "</div>"
Once you have finished adding your own settings, press the "Save" button to enable the gadget in the sidebar of your blog. That's it!

configure html javascript gadget

To change the background colors of the most commented posts, go to "Template" > hit the "Customize" button and navigate to "Advanced" > "Most Commented" tab. Here you can pick 5 different colors by clicking on the color boxes:

blogger template designer

Once you've selected your favorite color scheme, click the "Apply to blog" button to save the changes... and you're done.

Why Use the Most Commented Posts widget?

The basic psychology in every human is that they want to feel like they belong to a community. That's exactly what this customized widget will bring to your site. No matter what content drew a visitor to see your content, this widget will invite them to join the lively parts of your piece of the internet. This helps to build relationships, with you and with other visitors, and this relationship-building engagement is what you need to start having real value.

Take the time to install this most commented posts widget on your site and you'll see for yourself why this is one of the most useful widgets that is available right now. Enjoy ;)

Posted at December 22, 2020 |  by Online Ustaad

0 comments:

There's an unspoken rule in the world of web design that says that every website have a search box. You can, and should, design a custom search gadget to Blogger that contributes to the theme of your site while providing some key benefits to both your customers and you.

custom bloggersearch boxes

Benefits to Customers

Search boxes not only help to increase your website's design usability, but they're very convenient to site visitors and regulars. For those that have been to your site before, they know what they want and they want it now. These are the impatient people who don't feel like wading through different links. If you don't accommodate this problem you might risk losing those readers.

For newer customers who want to get a feel for your site before investing any more time, it gives them the chance to look for their interests on both eCommerce sites and blog sites.

Benefits To You

Adding a custom search gadget to Blogger perhaps best benefit eCommerce sites because it's an industry that inherently offers a lot of very specific products. For instance, if you sold clothing apparel and someone was only look for shirts, the search would result would only bring up shirts so that person can look through everything in one place.

Bloggers might not have products to offer, but adding a custom search gadget to Blogger can help site analytics and SEO. Google Analytics offers a tool that will track all the searches performed by your search bar, so that you can use this data when improving your keyword usage and content choices. Google web crawlers and search engine bots will also test out phrases in these boxes on the rare occasion to make sure that all your content leads to somewhere creates a closed loop.

Add Your Own Custom Search Gadget To Blogger

Just because you should have a search bar doesn't mean you you're restricted to what time. Your site's search bar should be easy to find and readily available whenever someone needs it, but other than that the look of the design is up to you. If you want to add a custom search gadget to Blogger, here are 6 stylish choices to pick from. Just copy the code below the search box that you want to add and follow the steps below:

<style type="text/css">
#searchbox{background:#d8d8d8;border:4px solid #e8e8e8;padding:20px 10px;width:250px}input:focus::-webkit-input-placeholder{color:transparent}input:focus:-moz-placeholder{color:transparent}input:focus::-moz-placeholder{color:transparent}#searchbox input{outline:none}#searchbox input[type="text"]{background:url(https://blogger.googleusercontent.com/img/b/R29vZ2xl/AVvXsEg7csC2HEYhyphenhyphen6Bo4pSovpNUu0V3BLQ2XfccU6oJKj_VreUSFSmMRZ9xsSTrOBDvu68MJDJk37anAIXU3HgdWaWlFL6PIBFNOrCu8-jTpBHGzj2VyVzDwPXaJBzptJwZTo-wd90HOZu4u2Z7/s1600/search-dark.png) no-repeat 10px 6px #fff;border-width:1px;border-style:solid;border-color:#fff;font:bold 12px Arial,Helvetica,Sans-serif;color:#bebebe;width:55%;padding:8px 15px 8px 30px}#button-submit{background:#6A6F75;border-width:0;padding:9px 0;width:23%;cursor:pointer;font:bold 12px Arial,Helvetica;color:#fff;text-shadow:0 1px 0 #555}#button-submit:hover{background:#4f5356}#button-submit:active{background:#5b5d60;outline:none}#button-submit::-moz-focus-inner{border:0}
</style>
<form id="searchbox" method="get" action="/search">
<input name="q" type="text" size="15" placeholder="Type here..." />

<input id="button-submit" type="submit" value="Search" /></form>

<style type="text/css">
#searchbox{width:240px}#searchbox input{outline:none}input:focus::-webkit-input-placeholder{color:transparent}input:focus:-moz-placeholder{color:transparent}input:focus::-moz-placeholder{color:transparent}#searchbox input[type="text"]{background:url(https://blogger.googleusercontent.com/img/b/R29vZ2xl/AVvXsEg7csC2HEYhyphenhyphen6Bo4pSovpNUu0V3BLQ2XfccU6oJKj_VreUSFSmMRZ9xsSTrOBDvu68MJDJk37anAIXU3HgdWaWlFL6PIBFNOrCu8-jTpBHGzj2VyVzDwPXaJBzptJwZTo-wd90HOZu4u2Z7/s1600/search-dark.png) no-repeat 10px 13px #f2f2f2;border:2px solid #f2f2f2;font:bold 12px Arial,Helvetica,Sans-serif;color:#6A6F75;width:160px;padding:14px 17px 12px 30px;-webkit-border-radius:5px 0 0 5px;-moz-border-radius:5px 0 0 5px;border-radius:5px 0 0 5px;text-shadow:0 2px 3px #fff;-webkit-transition:all 0.7s ease 0s;-moz-transition:all 0.7s ease 0s;-o-transition:all 0.7s ease 0s;transition:all 0.7s ease 0s;}#searchbox input[type="text"]:focus{background:#f7f7f7;border:2px solid #f7f7f7;width:200px;padding-left:10px}#button-submit{background:url(https://blogger.googleusercontent.com/img/b/R29vZ2xl/AVvXsEhsXbqOxHePQDHRAr6yMg8oVPdU7_7xcRmnEj1GE0lM-eyZ6yNki4f5hAlMYlAP2hcmD_ZTjWxyt1GHFtcEvGDasHWrnlqtlfbViESJ8LU9JVPI8mN-YL3gEweXR6Ystk45SossVOMskIYP/s1600/slider-arrow-right.png) no-repeat;margin-left:-40px;border-width:0;width:43px;height:45px}
</style>
<form id="searchbox" method="get" action="/search" autocomplete="off"><input name="q" type="text" size="15" placeholder="Enter keywords here..." />
<input id="button-submit" type="submit" value=" "/></form>

<style type="text/css">
#searchbox{background:url(https://blogger.googleusercontent.com/img/b/R29vZ2xl/AVvXsEiQLF7SUE6E0LGyUsvXAJau0Gzc__FdQfkhKqKTI4hoQJyJOYzoIEUOwl3yRE6VVqWmBXAd58IBGSDZstdJc8dc9ktgloLK0MNgRKkAMqANkFfpWI1Gr7ZUeANAH92E4brtQMKlN8_99XN2/s1600/searchbar.png) no-repeat;width:208px;height:29px}input:focus::-webkit-input-placeholder{color:transparent}input:focus:-moz-placeholder{color:transparent}input:focus::-moz-placeholder{color:transparent}#searchbox input{outline:none}#searchbox input[type="text"]{background:transparent;margin:3px 0 0 20px;padding:5px 0;border-width:0;font-family:"Arial Narrow",Arial,sans-serif;font-size:12px;color:#828282;width:70%;display:inline-table;vertical-align:top}#button-submit{background:url(https://blogger.googleusercontent.com/img/b/R29vZ2xl/AVvXsEjsKBNBeYbzcTTBJO4wZZ19yUhneP8fRZfT3O_s4SxHj7YidedL1CUMfuYP6dsxjG_yt75Twn0HwRulwQlAWAIU-H1pUyTAMpu2DkP1eUN_xJz-YRYL6meiymnI8Bkzz63gDmDX6Oeh_9vp/s1600/magnifier.png) no-repeat;border-width:0;cursor:pointer;margin-left:10px;margin-top:4px;width:21px;height:22px}#button-submit:hover{background:url(https://blogger.googleusercontent.com/img/b/R29vZ2xl/AVvXsEjuo97k5q8Y6AeQdsW5D61_24r04cJFm0afk8Rf2ndzf9mC594OmzGQxIpfyernTZdDV_1AZXQgQBMdKE2xenW2vHSM_kEWVcE6eWGGYduUS3aRhu1FoBBbCTVdyrMpub832xR0mWgWvaxq/s1600/magnifier-hover.png) no-repeat}#button-submit:active{background:url(https://blogger.googleusercontent.com/img/b/R29vZ2xl/AVvXsEjuo97k5q8Y6AeQdsW5D61_24r04cJFm0afk8Rf2ndzf9mC594OmzGQxIpfyernTZdDV_1AZXQgQBMdKE2xenW2vHSM_kEWVcE6eWGGYduUS3aRhu1FoBBbCTVdyrMpub832xR0mWgWvaxq/s1600/magnifier-hover.png) no-repeat;outline:none}#button-submit::-moz-focus-inner{border:0}
</style>
<form id="searchbox" method="get" action="/search" autocomplete="off"><input name="q" type="text" size="15" placeholder="search..." /><input id="button-submit" type="submit" value="" /></form>

<style type="text/css">
#searchbox{background:url(https://blogger.googleusercontent.com/img/b/R29vZ2xl/AVvXsEhaJ_v7rfYv24F1AuYeUEGqqw1_f-K1LStaP3o7xbAI8HT0g_mxIWQQa69cOI8K3-oVCjKkQl0hKE2czSBay8BUBqnN3_Shlr4pCELsfbHBPNLV_pR3usA4jhtxypVeDGAzpCC5c82Se1DW/s1600/search-box.png) no-repeat;height:27px;width:202px}input:focus::-webkit-input-placeholder{color:transparent}input:focus:-moz-placeholder{color:transparent}input:focus::-moz-placeholder{color:transparent}#searchbox input{outline:none}#searchbox input[type="text"]{background:transparent;margin:0 0 0 12px;padding:5px 0;border-width:0;font:italic 12px "Arial Narrow",Arial,sans-serif;width:77%;color:#828282;display:inline-table;vertical-align:top}#button-submit{background:url(https://blogger.googleusercontent.com/img/b/R29vZ2xl/AVvXsEh4FqSsqhNFWdwsl5fpWTw4aikHI4C-16DwuGnS68x5MPaHr6fezY765OFjRvIopEvILyBOcI256LwQnVn8kO2Y29J3P1PSKjnnCcJ0wVcfTTQTNYBpOBCThGDvCmdaw7QwLKRFHYZ9j6pH/s1600/search-button.png) no-repeat;border-width:0;cursor:pointer;width:30px;height:25px}#button-submit:hover{background:url(https://blogger.googleusercontent.com/img/b/R29vZ2xl/AVvXsEhlU0jDlUHpfFlHp5d1jwqBJDEjOX9TaQUvZZwIRyl83dOsw0qtGFCCvNXtrwEhJfCDs2MgCA5OiryhVTmM96oeWtHE1imjMnsrKZQ1cONywTmu8z7T6fEuSoiOojfXvNb8SZUEpYI55tI7/s1600/search-button-hover.png) no-repeat}#button-submit::-moz-focus-inner{border:0}
</style>
<form id="searchbox" method="get" action="/search" autocomplete="off"><input name="q" type="text" size="15" placeholder="search..." /><input id="button-submit" type="submit" value="" /></form>

<style type="text/css">
#searchbox{background:url(https://blogger.googleusercontent.com/img/b/R29vZ2xl/AVvXsEgo0NihgOznp_ZzvEZrdOyyCMBl-lertb_8C3Z2xZs_kS-t9_58S2stXfw6SX7sfVcZkSIXFJunSHJmPn-CGjk4punHk9taQ-9otfIGP0ciAr8f8yCqyyhSxWsb0M0EDM2gcfzTWrmOLM_4/s1600/search-box1.png) no-repeat;width:250px;height:65px}input:focus::-webkit-input-placeholder{color:transparent}input:focus:-moz-placeholder{color:transparent}input:focus::-moz-placeholder{color:transparent}#searchbox input{outline:none}#searchbox input[type="text"]{background:transparent;padding:2px 0 2px 20px;margin:10px 15px 0 0;border-width:0;font:bold 16px "Brush Script MT",cursive;color:#595959;width:65%;display:inline-table;vertical-align:top}#button-submit{background:url(https://blogger.googleusercontent.com/img/b/R29vZ2xl/AVvXsEiPcnbIVSebHaAibFTxN_-slngBTcI2dssPj8nowQZesc7Z37u-dI9LPqvmtEL7OxQzLJSg0wV8DZl7GvsesbnGVXHN03eq1UyxQY2EYXtTmadVhCUxoaoivT4HEE_oZFrHQys-cxsOUBZB/s1600/magnifier.png) no-repeat;border-width:0;cursor:pointer;margin-top:10px;width:19px;height:25px}#button-submit:hover{background:url(https://blogger.googleusercontent.com/img/b/R29vZ2xl/AVvXsEgebW50piEVaYXhZq_SaIKZNfB8BQV-NHq7nq6QtcqKLZHPMvCNI4pXpbnue3htdu0HG8RmVnsLMgYcD10yh406NcFMpn3rtai8fkhvNeEwi7ravcUtLQEWC5XGfxSHqwbXz9ZqfXSjdLD6/s1600/magnifier-hover.png) no-repeat}#button-submit:active{background:url(https://blogger.googleusercontent.com/img/b/R29vZ2xl/AVvXsEgebW50piEVaYXhZq_SaIKZNfB8BQV-NHq7nq6QtcqKLZHPMvCNI4pXpbnue3htdu0HG8RmVnsLMgYcD10yh406NcFMpn3rtai8fkhvNeEwi7ravcUtLQEWC5XGfxSHqwbXz9ZqfXSjdLD6/s1600/magnifier-hover.png) no-repeat;outline:none}#button-submit::-moz-focus-inner{border:0}
</style>
<form id="searchbox" method="get" action="/search" autocomplete="off"><input class="textarea" name="q" type="text" size="15" placeholder="Search here..." /><input id="button-submit" type="submit" value="" /></form>

<style type="text/css">
#searchbox{width:280px;background:url(https://blogger.googleusercontent.com/img/b/R29vZ2xl/AVvXsEjUwB6WOZ5Q0e6UeVIeIGWuHKZlNwWxTOe8OHBuWgAo5Yi_6rIRmjOSqi6Awe9FrB3qqfDGcpq2z9DPcEm5cwiSA5yRVq-r0_PInJTG9EHw4Tozxi4JBVtfX-qC6qNb45a13XbhL6HciTQI/s1600/search-box.png) no-repeat}#searchbox input{outline:none}input:focus::-webkit-input-placeholder{color:transparent}input:focus:-moz-placeholder{color:transparent}input:focus::-moz-placeholder{color:transparent}#searchbox input[type="text"]{background:transparent;border:0;font:14px "Avant Garde",Avantgarde,"Century Gothic",CenturyGothic,"AppleGothic",sans-serif;color:#f2f2f2!important;padding:10px 35px 10px 20px;width:220px}#searchbox input[type="text"]:focus{color:#fff}#button-submit{background:url(https://blogger.googleusercontent.com/img/b/R29vZ2xl/AVvXsEjwYumPzxDYSqrTAavM-M0dpHHrkhw2nfFYvaUY0651codaruIb3TcgJHTIGX_5xxqC1YjPeGXaIWrQWc3DoGfUEWyESSWlyML6lEyKzSfKZfwRpGrc9MSyJK1x9NA8iQ8yLYb8pp_G_Hdz/s1600/search-icon.png) no-repeat;margin-left:-40px;border-width:0;width:40px;height:50px;cursor:pointer}#button-submit:hover{background:url(https://blogger.googleusercontent.com/img/b/R29vZ2xl/AVvXsEhncz9Ni1y0DW3gMfb7TzAX1Nz7W4JhkV5xRM5AgJoWwQsICpc2s_Uj14Ny3ZvhRlIuaO-oi8SMeYhKBI1lt-RiX7rSUJfslyCE1Xb9qIQTiF7BaF-NqfbamswE-13XblcfvGqXSqdT2uv5/s1600/search-icon-hover.png)}
</style>
<form id="searchbox" method="get" action="/search" autocomplete="off"><input name="q" type="text" size="15" placeholder="Enter keywords here..." /><input id="button-submit" type="submit" value=" "/></form>

Steps: How to Add a Custom Search Box to Blogger

Step 1. Log in to your Blogger account, then go to Layout > click on the 'Add a gadget' link on the left side.

Step 2. Choose HTML/JavaScript from the pop-up window > paste the code of the search box inside the empty box.

Step 3. Press Save.


That's it!

There you have it, 6 stylish choices that will let you take advantage from all the great benefits of using a search box, while still helping you make your blog stand out. After adding your new search bar, your visitors will be able to navigate through your site and get to the same place using both the box and the navigation bar.

Add 6 Stylish Custom Search Boxes To Blogger

There's an unspoken rule in the world of web design that says that every website have a search box. You can, and should, design a custom search gadget to Blogger that contributes to the theme of your site while providing some key benefits to both your customers and you.

custom bloggersearch boxes

Benefits to Customers

Search boxes not only help to increase your website's design usability, but they're very convenient to site visitors and regulars. For those that have been to your site before, they know what they want and they want it now. These are the impatient people who don't feel like wading through different links. If you don't accommodate this problem you might risk losing those readers.

For newer customers who want to get a feel for your site before investing any more time, it gives them the chance to look for their interests on both eCommerce sites and blog sites.

Benefits To You

Adding a custom search gadget to Blogger perhaps best benefit eCommerce sites because it's an industry that inherently offers a lot of very specific products. For instance, if you sold clothing apparel and someone was only look for shirts, the search would result would only bring up shirts so that person can look through everything in one place.

Bloggers might not have products to offer, but adding a custom search gadget to Blogger can help site analytics and SEO. Google Analytics offers a tool that will track all the searches performed by your search bar, so that you can use this data when improving your keyword usage and content choices. Google web crawlers and search engine bots will also test out phrases in these boxes on the rare occasion to make sure that all your content leads to somewhere creates a closed loop.

Add Your Own Custom Search Gadget To Blogger

Just because you should have a search bar doesn't mean you you're restricted to what time. Your site's search bar should be easy to find and readily available whenever someone needs it, but other than that the look of the design is up to you. If you want to add a custom search gadget to Blogger, here are 6 stylish choices to pick from. Just copy the code below the search box that you want to add and follow the steps below:

<style type="text/css">
#searchbox{background:#d8d8d8;border:4px solid #e8e8e8;padding:20px 10px;width:250px}input:focus::-webkit-input-placeholder{color:transparent}input:focus:-moz-placeholder{color:transparent}input:focus::-moz-placeholder{color:transparent}#searchbox input{outline:none}#searchbox input[type="text"]{background:url(https://blogger.googleusercontent.com/img/b/R29vZ2xl/AVvXsEg7csC2HEYhyphenhyphen6Bo4pSovpNUu0V3BLQ2XfccU6oJKj_VreUSFSmMRZ9xsSTrOBDvu68MJDJk37anAIXU3HgdWaWlFL6PIBFNOrCu8-jTpBHGzj2VyVzDwPXaJBzptJwZTo-wd90HOZu4u2Z7/s1600/search-dark.png) no-repeat 10px 6px #fff;border-width:1px;border-style:solid;border-color:#fff;font:bold 12px Arial,Helvetica,Sans-serif;color:#bebebe;width:55%;padding:8px 15px 8px 30px}#button-submit{background:#6A6F75;border-width:0;padding:9px 0;width:23%;cursor:pointer;font:bold 12px Arial,Helvetica;color:#fff;text-shadow:0 1px 0 #555}#button-submit:hover{background:#4f5356}#button-submit:active{background:#5b5d60;outline:none}#button-submit::-moz-focus-inner{border:0}
</style>
<form id="searchbox" method="get" action="/search">
<input name="q" type="text" size="15" placeholder="Type here..." />

<input id="button-submit" type="submit" value="Search" /></form>

<style type="text/css">
#searchbox{width:240px}#searchbox input{outline:none}input:focus::-webkit-input-placeholder{color:transparent}input:focus:-moz-placeholder{color:transparent}input:focus::-moz-placeholder{color:transparent}#searchbox input[type="text"]{background:url(https://blogger.googleusercontent.com/img/b/R29vZ2xl/AVvXsEg7csC2HEYhyphenhyphen6Bo4pSovpNUu0V3BLQ2XfccU6oJKj_VreUSFSmMRZ9xsSTrOBDvu68MJDJk37anAIXU3HgdWaWlFL6PIBFNOrCu8-jTpBHGzj2VyVzDwPXaJBzptJwZTo-wd90HOZu4u2Z7/s1600/search-dark.png) no-repeat 10px 13px #f2f2f2;border:2px solid #f2f2f2;font:bold 12px Arial,Helvetica,Sans-serif;color:#6A6F75;width:160px;padding:14px 17px 12px 30px;-webkit-border-radius:5px 0 0 5px;-moz-border-radius:5px 0 0 5px;border-radius:5px 0 0 5px;text-shadow:0 2px 3px #fff;-webkit-transition:all 0.7s ease 0s;-moz-transition:all 0.7s ease 0s;-o-transition:all 0.7s ease 0s;transition:all 0.7s ease 0s;}#searchbox input[type="text"]:focus{background:#f7f7f7;border:2px solid #f7f7f7;width:200px;padding-left:10px}#button-submit{background:url(https://blogger.googleusercontent.com/img/b/R29vZ2xl/AVvXsEhsXbqOxHePQDHRAr6yMg8oVPdU7_7xcRmnEj1GE0lM-eyZ6yNki4f5hAlMYlAP2hcmD_ZTjWxyt1GHFtcEvGDasHWrnlqtlfbViESJ8LU9JVPI8mN-YL3gEweXR6Ystk45SossVOMskIYP/s1600/slider-arrow-right.png) no-repeat;margin-left:-40px;border-width:0;width:43px;height:45px}
</style>
<form id="searchbox" method="get" action="/search" autocomplete="off"><input name="q" type="text" size="15" placeholder="Enter keywords here..." />
<input id="button-submit" type="submit" value=" "/></form>

<style type="text/css">
#searchbox{background:url(https://blogger.googleusercontent.com/img/b/R29vZ2xl/AVvXsEiQLF7SUE6E0LGyUsvXAJau0Gzc__FdQfkhKqKTI4hoQJyJOYzoIEUOwl3yRE6VVqWmBXAd58IBGSDZstdJc8dc9ktgloLK0MNgRKkAMqANkFfpWI1Gr7ZUeANAH92E4brtQMKlN8_99XN2/s1600/searchbar.png) no-repeat;width:208px;height:29px}input:focus::-webkit-input-placeholder{color:transparent}input:focus:-moz-placeholder{color:transparent}input:focus::-moz-placeholder{color:transparent}#searchbox input{outline:none}#searchbox input[type="text"]{background:transparent;margin:3px 0 0 20px;padding:5px 0;border-width:0;font-family:"Arial Narrow",Arial,sans-serif;font-size:12px;color:#828282;width:70%;display:inline-table;vertical-align:top}#button-submit{background:url(https://blogger.googleusercontent.com/img/b/R29vZ2xl/AVvXsEjsKBNBeYbzcTTBJO4wZZ19yUhneP8fRZfT3O_s4SxHj7YidedL1CUMfuYP6dsxjG_yt75Twn0HwRulwQlAWAIU-H1pUyTAMpu2DkP1eUN_xJz-YRYL6meiymnI8Bkzz63gDmDX6Oeh_9vp/s1600/magnifier.png) no-repeat;border-width:0;cursor:pointer;margin-left:10px;margin-top:4px;width:21px;height:22px}#button-submit:hover{background:url(https://blogger.googleusercontent.com/img/b/R29vZ2xl/AVvXsEjuo97k5q8Y6AeQdsW5D61_24r04cJFm0afk8Rf2ndzf9mC594OmzGQxIpfyernTZdDV_1AZXQgQBMdKE2xenW2vHSM_kEWVcE6eWGGYduUS3aRhu1FoBBbCTVdyrMpub832xR0mWgWvaxq/s1600/magnifier-hover.png) no-repeat}#button-submit:active{background:url(https://blogger.googleusercontent.com/img/b/R29vZ2xl/AVvXsEjuo97k5q8Y6AeQdsW5D61_24r04cJFm0afk8Rf2ndzf9mC594OmzGQxIpfyernTZdDV_1AZXQgQBMdKE2xenW2vHSM_kEWVcE6eWGGYduUS3aRhu1FoBBbCTVdyrMpub832xR0mWgWvaxq/s1600/magnifier-hover.png) no-repeat;outline:none}#button-submit::-moz-focus-inner{border:0}
</style>
<form id="searchbox" method="get" action="/search" autocomplete="off"><input name="q" type="text" size="15" placeholder="search..." /><input id="button-submit" type="submit" value="" /></form>

<style type="text/css">
#searchbox{background:url(https://blogger.googleusercontent.com/img/b/R29vZ2xl/AVvXsEhaJ_v7rfYv24F1AuYeUEGqqw1_f-K1LStaP3o7xbAI8HT0g_mxIWQQa69cOI8K3-oVCjKkQl0hKE2czSBay8BUBqnN3_Shlr4pCELsfbHBPNLV_pR3usA4jhtxypVeDGAzpCC5c82Se1DW/s1600/search-box.png) no-repeat;height:27px;width:202px}input:focus::-webkit-input-placeholder{color:transparent}input:focus:-moz-placeholder{color:transparent}input:focus::-moz-placeholder{color:transparent}#searchbox input{outline:none}#searchbox input[type="text"]{background:transparent;margin:0 0 0 12px;padding:5px 0;border-width:0;font:italic 12px "Arial Narrow",Arial,sans-serif;width:77%;color:#828282;display:inline-table;vertical-align:top}#button-submit{background:url(https://blogger.googleusercontent.com/img/b/R29vZ2xl/AVvXsEh4FqSsqhNFWdwsl5fpWTw4aikHI4C-16DwuGnS68x5MPaHr6fezY765OFjRvIopEvILyBOcI256LwQnVn8kO2Y29J3P1PSKjnnCcJ0wVcfTTQTNYBpOBCThGDvCmdaw7QwLKRFHYZ9j6pH/s1600/search-button.png) no-repeat;border-width:0;cursor:pointer;width:30px;height:25px}#button-submit:hover{background:url(https://blogger.googleusercontent.com/img/b/R29vZ2xl/AVvXsEhlU0jDlUHpfFlHp5d1jwqBJDEjOX9TaQUvZZwIRyl83dOsw0qtGFCCvNXtrwEhJfCDs2MgCA5OiryhVTmM96oeWtHE1imjMnsrKZQ1cONywTmu8z7T6fEuSoiOojfXvNb8SZUEpYI55tI7/s1600/search-button-hover.png) no-repeat}#button-submit::-moz-focus-inner{border:0}
</style>
<form id="searchbox" method="get" action="/search" autocomplete="off"><input name="q" type="text" size="15" placeholder="search..." /><input id="button-submit" type="submit" value="" /></form>

<style type="text/css">
#searchbox{background:url(https://blogger.googleusercontent.com/img/b/R29vZ2xl/AVvXsEgo0NihgOznp_ZzvEZrdOyyCMBl-lertb_8C3Z2xZs_kS-t9_58S2stXfw6SX7sfVcZkSIXFJunSHJmPn-CGjk4punHk9taQ-9otfIGP0ciAr8f8yCqyyhSxWsb0M0EDM2gcfzTWrmOLM_4/s1600/search-box1.png) no-repeat;width:250px;height:65px}input:focus::-webkit-input-placeholder{color:transparent}input:focus:-moz-placeholder{color:transparent}input:focus::-moz-placeholder{color:transparent}#searchbox input{outline:none}#searchbox input[type="text"]{background:transparent;padding:2px 0 2px 20px;margin:10px 15px 0 0;border-width:0;font:bold 16px "Brush Script MT",cursive;color:#595959;width:65%;display:inline-table;vertical-align:top}#button-submit{background:url(https://blogger.googleusercontent.com/img/b/R29vZ2xl/AVvXsEiPcnbIVSebHaAibFTxN_-slngBTcI2dssPj8nowQZesc7Z37u-dI9LPqvmtEL7OxQzLJSg0wV8DZl7GvsesbnGVXHN03eq1UyxQY2EYXtTmadVhCUxoaoivT4HEE_oZFrHQys-cxsOUBZB/s1600/magnifier.png) no-repeat;border-width:0;cursor:pointer;margin-top:10px;width:19px;height:25px}#button-submit:hover{background:url(https://blogger.googleusercontent.com/img/b/R29vZ2xl/AVvXsEgebW50piEVaYXhZq_SaIKZNfB8BQV-NHq7nq6QtcqKLZHPMvCNI4pXpbnue3htdu0HG8RmVnsLMgYcD10yh406NcFMpn3rtai8fkhvNeEwi7ravcUtLQEWC5XGfxSHqwbXz9ZqfXSjdLD6/s1600/magnifier-hover.png) no-repeat}#button-submit:active{background:url(https://blogger.googleusercontent.com/img/b/R29vZ2xl/AVvXsEgebW50piEVaYXhZq_SaIKZNfB8BQV-NHq7nq6QtcqKLZHPMvCNI4pXpbnue3htdu0HG8RmVnsLMgYcD10yh406NcFMpn3rtai8fkhvNeEwi7ravcUtLQEWC5XGfxSHqwbXz9ZqfXSjdLD6/s1600/magnifier-hover.png) no-repeat;outline:none}#button-submit::-moz-focus-inner{border:0}
</style>
<form id="searchbox" method="get" action="/search" autocomplete="off"><input class="textarea" name="q" type="text" size="15" placeholder="Search here..." /><input id="button-submit" type="submit" value="" /></form>

<style type="text/css">
#searchbox{width:280px;background:url(https://blogger.googleusercontent.com/img/b/R29vZ2xl/AVvXsEjUwB6WOZ5Q0e6UeVIeIGWuHKZlNwWxTOe8OHBuWgAo5Yi_6rIRmjOSqi6Awe9FrB3qqfDGcpq2z9DPcEm5cwiSA5yRVq-r0_PInJTG9EHw4Tozxi4JBVtfX-qC6qNb45a13XbhL6HciTQI/s1600/search-box.png) no-repeat}#searchbox input{outline:none}input:focus::-webkit-input-placeholder{color:transparent}input:focus:-moz-placeholder{color:transparent}input:focus::-moz-placeholder{color:transparent}#searchbox input[type="text"]{background:transparent;border:0;font:14px "Avant Garde",Avantgarde,"Century Gothic",CenturyGothic,"AppleGothic",sans-serif;color:#f2f2f2!important;padding:10px 35px 10px 20px;width:220px}#searchbox input[type="text"]:focus{color:#fff}#button-submit{background:url(https://blogger.googleusercontent.com/img/b/R29vZ2xl/AVvXsEjwYumPzxDYSqrTAavM-M0dpHHrkhw2nfFYvaUY0651codaruIb3TcgJHTIGX_5xxqC1YjPeGXaIWrQWc3DoGfUEWyESSWlyML6lEyKzSfKZfwRpGrc9MSyJK1x9NA8iQ8yLYb8pp_G_Hdz/s1600/search-icon.png) no-repeat;margin-left:-40px;border-width:0;width:40px;height:50px;cursor:pointer}#button-submit:hover{background:url(https://blogger.googleusercontent.com/img/b/R29vZ2xl/AVvXsEhncz9Ni1y0DW3gMfb7TzAX1Nz7W4JhkV5xRM5AgJoWwQsICpc2s_Uj14Ny3ZvhRlIuaO-oi8SMeYhKBI1lt-RiX7rSUJfslyCE1Xb9qIQTiF7BaF-NqfbamswE-13XblcfvGqXSqdT2uv5/s1600/search-icon-hover.png)}
</style>
<form id="searchbox" method="get" action="/search" autocomplete="off"><input name="q" type="text" size="15" placeholder="Enter keywords here..." /><input id="button-submit" type="submit" value=" "/></form>

Steps: How to Add a Custom Search Box to Blogger

Step 1. Log in to your Blogger account, then go to Layout > click on the 'Add a gadget' link on the left side.

Step 2. Choose HTML/JavaScript from the pop-up window > paste the code of the search box inside the empty box.

Step 3. Press Save.


That's it!

There you have it, 6 stylish choices that will let you take advantage from all the great benefits of using a search box, while still helping you make your blog stand out. After adding your new search bar, your visitors will be able to navigate through your site and get to the same place using both the box and the navigation bar.

Posted at December 22, 2020 |  by Online Ustaad

0 comments:

For bloggers that pride themselves on always staying up-to-date with new content, a recent post widget for Blogger can be an invaluable tool. A recent posts widget for blogger is in many ways similar to a 'breaking news alert' that journalists love to use during their reports, providing the most recent and relevant posts that you have to offer.

recent posts for blogger
Adding a recent post widget for Blogger helps to reduce the dependency on email marketing, because you don't have to send out an email just to let people know you made a new post. Instead, it updates automatically for everyone to see. You can then use this information to design scheduled email newsletters, and take advantage of what's often referred to as the 'Twitter effect' where audiences will regularly check back on your site for the possibility that new posts are available. Without this, you force people to do run their own search for information and content, increasing the likelihood that they'll leave the site and hurt your bounce rate.

blogger recent posts widgets

Once you've managed to attract visitors to one of your posts using the recent post widget for Blogger, it will continue to act as an accessible secondary resource to navigate around your site. That way, you can avoid having them sifting through old content that might be outdated. If you'd rather show off some of your best posts instead of your most recent posts, you can do that instead, or add that feature to the bar with just a few alterations.

Apart from looking great and taking up minimal space, there are too many benefits for you not to have a recent post widget for Blogger. The best part about these add-ons is that they come in a wide variety of designs that will fit any theme.


If you're interested in adding a widget to your site, here are 5 cool recent post widgets that might catch your eye and fit perfectly with your Blogger template:

Recent Posts Style #1

rainbow widget, recent posts
<script type="text/javascript">
function showlatestpostswiththumbs(t){document.write('<ul class="recent-posts-container">');for(var e=0;e<posts_no;e++){var r,n=t.feed.entry[e],i=n.title.$t;if(e==t.feed.entry.length)break;for(var o=0;o<n.link.length;o++){if("replies"==n.link[o].rel&&"text/html"==n.link[o].type)var l=n.link[o].title,m=n.link[o].href;if("alternate"==n.link[o].rel){r=n.link[o].href;break}}var u;try{u=n.media$thumbnail.url}catch(h){s=n.content.$t,a=s.indexOf("<img"),b=s.indexOf('src="',a),c=s.indexOf('"',b+5),d=s.substr(b+5,c-b-5),u=-1!=a&&-1!=b&&-1!=c&&""!=d?d:"https://blogger.googleusercontent.com/img/b/R29vZ2xl/AVvXsEgmUq0knxuz4Rz7cpfk_8qJEEvjv0xhMp5kMxQ9VweyCqENVy9WiaFG7HR2lcw3Xj77X0iHMMZM-67sxAmcmSiX4xCsHZ2i-zisYdbxyqAnxqZmOCYa_844Dv-4zhdAKfNWQ0bqP5ijOTEA/s1600/no-thumb.png"}var p=n.published.$t,f=p.substring(0,4),g=p.substring(5,7),v=p.substring(8,10),w=new Array;if(w[1]="Jan",w[2]="Feb",w[3]="Mar",w[4]="Apr",w[5]="May",w[6]="Jun",w[7]="Jul",w[8]="Aug",w[9]="Sep",w[10]="Oct",w[11]="Nov",w[12]="Dec",document.write('<li class="recent-posts-list">'),1==showpoststhumbs&&document.write('<a href="'+r+'"><img class="recent-post-thumb" src="'+u+'"/></a>'),document.write('<div class="recent-post-title"><a href="'+r+'" target ="_top">'+i+"</a></div>"),"content"in n)var A=n.content.$t;else if("summary"in n)var A=n.summary.$t;else var A="";var k=/<\S[^>]*>/g;if(A=A.replace(k,""),1==post_summary)if(A.length<summary_chars)document.write(A);else{A=A.substring(0,summary_chars);var y=A.lastIndexOf(" ");A=A.substring(0,y),document.write(A+"...")}var _="",$=0;document.write('<br><div class="recent-posts-details">'),1==posts_date&&(_=_+w[parseInt(g,10)]+" "+v+" "+f,$=1),1==readmorelink&&(1==$&&(_+=" | "),_=_+'<a href="'+r+'" class="url" target ="_top">Read more</a>',$=1),1==showcommentslink&&(1==$&&(_+=" <br> "),"1 Comments"==l&&(l="1 Comment"),"0 Comments"==l&&(l="No Comments"),l='<a href="'+m+'" target ="_top">'+l+"</a>",_+=l,$=1),document.write(_),document.write("</div>"),document.write("</li>")}document.write("</ul>")}
</script>
<script type="text/javascript">
var posts_no = 5;
var showpoststhumbs = true;
var readmorelink = true;
var showcommentslink = false;
var posts_date = true;
var post_summary = true;
var summary_chars = 70;
</script>
<script src="/feeds/posts/default?orderby=published&alt=json-in-script&callback=showlatestpostswiththumbs"></script>
<a style="font-size: 9px; color: #CECECE; margin-top: 10px;" href="http://helplogger.blogspot.com/2014/11/5-cool-recent-post-widgets-for-blogger.html" rel="nofollow">Recent Posts Widget</a>

<noscript>Your browser does not support JavaScript!</noscript>
<link href='http://fonts.googleapis.com/css?family=Ubuntu+Condensed' rel='stylesheet' type='text/css' />
<style type="text/css">
img.recent-post-thumb{width:50px;height:50px;float:right;margin:5px -5px 0px 0px;-webkit-border-radius:50%;-moz-border-radius:50%;border-radius:50%;padding:3px;background: #fff}
ul.recent-posts-container {list-style-type: none; background: #fff;padding: 0px;font:12px 'Ubuntu Condensed', sans-serif;margin: 5px 0px 5px 0px;}
ul.recent-posts-container li:nth-child(1n+0) {background: #F49A9A; width: 100%}
ul.recent-posts-container li:nth-child(2n+0) {background: #FCD092; width: 95%}
ul.recent-posts-container li:nth-child(3n+0) {background: #FFF59E; width: 90%;}
ul.recent-posts-container li:nth-child(4n+0) {background: #E1EFA0; width: 85%;}
ul.recent-posts-container li:nth-child(5n+0) {background: #B1DAEF; width: 80%;}
ul.recent-posts-container li {padding:5px 10px;list-style-type: none; margin: 0 0 -5px; color: #777;}
.recent-posts-container a { text-decoration:none; }
.recent-posts-container a:hover { color: #222;}
.post-date {color:#e0c0c6; font-size: 11px; }
.recent-post-title a {font-size: 14px;color: #444; font-weight: bold;}
.recent-post-title {padding: 6px 0px;}
.recent-posts-details a{ color: #222;}
.recent-posts-details {padding: 5px 0px 5px; }
</style>

Recent Posts Style #2

recent posts widget for blogger
<div class="recentpoststyle">
<script type="text/javascript">
function showlatestposts(e){for(var t=0;t<posts_no;t++){var r,s=e.feed.entry[t],n=s.title.$t;if(t==e.feed.entry.length)break;for(var a=0;a<s.link.length;a++)if("alternate"==s.link[a].rel){r=s.link[a].href;break}n=n.link(r);var i="... read more";i=i.link(r);var l=s.published.$t,o=l.substring(0,4),u=l.substring(5,7),c=l.substring(8,10),m=new Array;if(m[1]="Jan",m[2]="Feb",m[3]="Mar",m[4]="Apr",m[5]="May",m[6]="Jun",m[7]="Jul",m[8]="Aug",m[9]="Sep",m[10]="Oct",m[11]="Nov",m[12]="Dec","content"in s)var d=s.content.$t;else if("summary"in s)var d=s.summary.$t;else var d="";var v=/<\S[^>]*>/g;if(d=d.replace(v,""),document.write('<li class="recent-post-title">'),document.write(n),document.write('</li><div class="recent-post-summ">'),1==post_summary)if(d.length<summary_chars)document.write(d);else{d=d.substring(0,summary_chars);var f=d.lastIndexOf(" ");d=d.substring(0,f),document.write(d+" "+i)}document.write("</div>"),1==posts_date&&document.write('<div class="post-date">'+m[parseInt(u,10)]+" "+c+" "+o+"</div>")}}
</script>
<script type="text/javascript">
var posts_no = 5;var posts_date = true;var post_summary = true;var summary_chars = 80;</script>
<script src="/feeds/posts/default?orderby=published&amp;alt=json-in-script&amp;callback=showlatestposts">
</script><a style="font-size: 9px; color: #CECECE;margin-top:10px;" href="http://helplogger.blogspot.com/2014/11/5-cool-recent-post-widgets-for-blogger.html" rel="nofollow">Recent Posts Widget</a>
<noscript>Your browser does not support JavaScript!</noscript>
<style type="text/css">
.recentpoststyle {counter-reset: countposts;list-style-type: none;}
.recentpoststyle a {text-decoration: none;color: #49A8D1;}
.recentpoststyle a:hover {color: #000;}
.recentpoststyle li:before {content: counter(countposts,decimal);counter-increment: countposts;float: left;z-index: 1;position:relative;font-size: 15px;font-weight: bold;color:#fff;background:#69B7E2; margin:13px 5px 0px -6px;line-height:30px;width:30px;height:30px;text-align:center;-webkit-border-radius:50%;-moz-border-radius:50%;border-radius:50%;}li.recent-post-title{margin-bottom: 5px;padding: 0;}
.recent-post-title a {color: #444;text-decoration: none;font: bold 13px "Avant Garde",Avantgarde,"Century Gothic",CenturyGothic,AppleGothic,sans-serif;}
.post-date {font-size: 11px;color: #999;margin:5px 0px 15px 32px;}
.recent-post-summ {border-left:1px solid #69B7E2; color: #777; padding: 0px 5px 0px 20px; margin-left: 10px; font: 15px Garamond,Baskerville,"Baskerville Old Face","Hoefler Text","Times New Roman",serif;}
</style></div>

Recent Posts Style #3

recent posts gadget

<script type="text/javascript">
function showlatestpostswiththumbs(t){document.write('<ul class="recent-posts-container">');for(var e=0;e<posts_no;e++){var r,n=t.feed.entry[e],i=n.title.$t;if(e==t.feed.entry.length)break;for(var o=0;o<n.link.length;o++){if("replies"==n.link[o].rel&&"text/html"==n.link[o].type)var l=n.link[o].title,m=n.link[o].href;if("alternate"==n.link[o].rel){r=n.link[o].href;break}}var u;try{u=n.media$thumbnail.url}catch(h){s=n.content.$t,a=s.indexOf("<img"),b=s.indexOf('src="',a),c=s.indexOf('"',b+5),d=s.substr(b+5,c-b-5),u=-1!=a&&-1!=b&&-1!=c&&""!=d?d:"https://blogger.googleusercontent.com/img/b/R29vZ2xl/AVvXsEgmUq0knxuz4Rz7cpfk_8qJEEvjv0xhMp5kMxQ9VweyCqENVy9WiaFG7HR2lcw3Xj77X0iHMMZM-67sxAmcmSiX4xCsHZ2i-zisYdbxyqAnxqZmOCYa_844Dv-4zhdAKfNWQ0bqP5ijOTEA/s1600/no-thumb.png"}var p=n.published.$t,f=p.substring(0,4),g=p.substring(5,7),v=p.substring(8,10),w=new Array;if(w[1]="Jan",w[2]="Feb",w[3]="Mar",w[4]="Apr",w[5]="May",w[6]="Jun",w[7]="Jul",w[8]="Aug",w[9]="Sep",w[10]="Oct",w[11]="Nov",w[12]="Dec",document.write('<li class="recent-posts-list">'),1==showpoststhumbs&&document.write('<a href="'+r+'"><img class="recent-post-thumb" src="'+u+'"/></a>'),document.write('<div class="recent-post-title"><a href="'+r+'" target ="_top">'+i+"</a></div>"),"content"in n)var A=n.content.$t;else if("summary"in n)var A=n.summary.$t;else var A="";var k=/<\S[^>]*>/g;if(A=A.replace(k,""),1==post_summary)if(A.length<summary_chars)document.write(A);else{A=A.substring(0,summary_chars);var y=A.lastIndexOf(" ");A=A.substring(0,y),document.write(A+"...")}var _="",$=0;document.write('<br><div class="recent-posts-details">'),1==posts_date&&(_=_+w[parseInt(g,10)]+" "+v+" "+f,$=1),1==readmorelink&&(1==$&&(_+=" | "),_=_+'<a href="'+r+'" class="url" target ="_top">Read more</a>',$=1),1==showcommentslink&&(1==$&&(_+=" <br> "),"1 Comments"==l&&(l="1 Comment"),"0 Comments"==l&&(l="No Comments"),l='<a href="'+m+'" target ="_top">'+l+"</a>",_+=l,$=1),document.write(_),document.write("</div>"),document.write("</li>")}document.write("</ul>")}
</script>
<script type="text/javascript">
var posts_no = 5;
var showpoststhumbs = true;
var readmorelink = true;
var showcommentslink = true;
var posts_date = true;
var post_summary = true;
var summary_chars = 40;</script>
<script src="/feeds/posts/default?orderby=published&alt=json-in-script&callback=showlatestpostswiththumbs"></script>
<a style="font-size: 9px; color: #CECECE; margin-top: 10px;" href="http://helplogger.blogspot.com/2014/11/5-cool-recent-post-widgets-for-blogger.html" rel="nofollow">Recent Posts Widget</a>

<noscript>Your browser does not support JavaScript!</noscript>

<link href='http://fonts.googleapis.com/css?family=Oswald' rel='stylesheet' type='text/css'/>
<style type="text/css">
img.recent-post-thumb{padding:2px;width:65px;height:65px;float:left;margin:0px 10px 10px;border: 1px solid #69B7E2;}
.recent-posts-container {font-family:'Oswald', sans-serif;font-size:12px;}
ul.recent-posts-container li{list-style-type: none; margin-bottom: 10px;font-size:12px;float:left;width:100%}
ul.recent-posts-container {counter-reset: countposts;list-style-type:none;padding:0;}
ul.recent-posts-container li:before {content: counter(countposts,decimal);counter-increment: countposts;z-index: 1;position:absolute; left: 0px; font-size: 13px;font-weight: bold;color: #fff;background: #69B7E2;line-height:25px;height:25px;width:25px;text-align:center;-webkit-border-radius: 50%;-moz-border-radius: 50%;border-radius: 50%;}
.recent-posts-container a{text-decoration:none;}
.recent-post-title {margin-bottom:5px;}
.recent-post-title a {font-size:12px; text-transform: uppercase; color: #2aace3;}
.recent-posts-details {margin: 5px 0px 0px 92px;font-size:11px;}
.recent-posts-details a{color: #777;}
</style>

Recent Posts Style #4

recent posts for blogger, cool widgets
<script type="text/javascript">
function showlatestpostswiththumbs(t){document.write('<ul class="recent-posts-container">');for(var e=0;e<posts_no;e++){var r,n=t.feed.entry[e],i=n.title.$t;if(e==t.feed.entry.length)break;for(var o=0;o<n.link.length;o++){if("replies"==n.link[o].rel&&"text/html"==n.link[o].type)var l=n.link[o].title,m=n.link[o].href;if("alternate"==n.link[o].rel){r=n.link[o].href;break}}var u;try{u=n.media$thumbnail.url}catch(p){s=n.content.$t,a=s.indexOf("<img"),b=s.indexOf('src="',a),c=s.indexOf('"',b+5),d=s.substr(b+5,c-b-5),u=-1!=a&&-1!=b&&-1!=c&&""!=d?d:"https://blogger.googleusercontent.com/img/b/R29vZ2xl/AVvXsEgmUq0knxuz4Rz7cpfk_8qJEEvjv0xhMp5kMxQ9VweyCqENVy9WiaFG7HR2lcw3Xj77X0iHMMZM-67sxAmcmSiX4xCsHZ2i-zisYdbxyqAnxqZmOCYa_844Dv-4zhdAKfNWQ0bqP5ijOTEA/s1600/no-thumb.png"}var h=n.published.$t,f=h.substring(0,4),w=h.substring(5,7),v=h.substring(8,10),A=new Array;A[1]="Jan",A[2]="Feb",A[3]="Mar",A[4]="Apr",A[5]="May",A[6]="Jun",A[7]="Jul",A[8]="Aug",A[9]="Sep",A[10]="Oct",A[11]="Nov",A[12]="Dec",document.write('<li class="recent-posts-list">'),1==posts_date&&document.write('<div class="post-date">'+A[parseInt(w,10)]+" "+v+" "+f+"</div>"),1==showpoststhumbs&&document.write('<a href="'+r+'"><img class="recent-post-thumb" src="'+u+'"/></a>'),document.write('<div class="recent-post-title"><a href="'+r+'" target ="_top">'+i+"</a></div>");var g="",k=0;document.write('<div class="recent-posts-details">'),1==showcommentslink&&(1==k&&(g+=" <br> "),"1 Comments"==l&&(l="1 Comment"),"0 Comments"==l&&(l="No Comments"),l='<a href="'+m+'" target ="_top">'+l+"</a>",g+=l,k=1),1==readmorelink&&(1==k&&(g+=" | "),g=g+'<a class="readmorelink" href="'+r+'" class="url" target ="_top">Read more</a>',k=1),document.write(g),document.write("</div>"),document.write("</li>")}document.write("</ul>")}
</script>
<script type="text/javascript">
var posts_no = 5;
var showpoststhumbs = false;
var readmorelink = true;
var showcommentslink = true;
var posts_date = true;
</script>
<script src="/feeds/posts/default?orderby=published&alt=json-in-script&callback=showlatestpostswiththumbs"></script>
<a style="font-size: 9px; color: #CECECE; float: right; margin-top: 5px;" href="http://helplogger.blogspot.com/2014/11/5-cool-recent-post-widgets-for-blogger.html">Recent Posts Widget</a>
<noscript>Your browser does not support JavaScript!</noscript>
<link href='http://fonts.googleapis.com/css?family=Oswald' rel='stylesheet' type='text/css'/>
<style type="text/css">
img.recent-post-thumb {padding: 2px; width:35px;height:35px;float:right;margin: -14px 0px 0px 5px; border: 1px solid #cea5ac; border-radius: 10%;}
.recent-posts-container {font-family: 'Oswald', sans-serif;  float: left;width: 100%;min-height: 70px;margin: 5px 0px 5px 0px;padding: 0;font-size:12px;}
ul.recent-posts-container li {padding:5px 0px;min-height:65px; list-style-type: none; margin: 0px 10px 5px 35px;}
ul.recent-posts-container {counter-reset: countposts;list-style-type: none;}
ul.recent-posts-container li:before {content: counter(countposts,decimal);counter-increment: countposts;z-index: 2;position:absolute; left: 5px; font-size: 16px;color: #4D4D4D;background: #F7F7F7;padding: 9px 14px; border: 1px solid #efefef;}
.recent-posts-container a { text-decoration:none; }
.recent-posts-container a:hover{color: #4DACE3;}
.post-date {color:#e0c0c6; font-size: 11px; }
.recent-post-title a {font-size: 13px; text-transform: uppercase; color: #5C4D4D;}
.recent-post-title { margin: 5px 0px; }
.recent-posts-details {border-top: 4px solid #AC707A; margin-top: 5px; padding-top: 5px;}
.recent-posts-details a{ color: #888;}
a.readmorelink {color: #4DACE3;}
</style>

Recent Post Style #5

recent posts, blogger gadget
<script type="text/javascript">
function showlatestpostswiththumbs(t){document.write('<ul class="recent-posts-container">');for(var e=0;e<posts_no;e++){var r,n=t.feed.entry[e],i=n.title.$t;if(e==t.feed.entry.length)break;for(var o=0;o<n.link.length;o++){if("replies"==n.link[o].rel&&"text/html"==n.link[o].type)var l=n.link[o].title,m=n.link[o].href;if("alternate"==n.link[o].rel){r=n.link[o].href;break}}var u;try{u=n.media$thumbnail.url}catch(p){s=n.content.$t,a=s.indexOf("<img"),b=s.indexOf('src="',a),c=s.indexOf('"',b+5),d=s.substr(b+5,c-b-5),u=-1!=a&&-1!=b&&-1!=c&&""!=d?d:"https://blogger.googleusercontent.com/img/b/R29vZ2xl/AVvXsEgmUq0knxuz4Rz7cpfk_8qJEEvjv0xhMp5kMxQ9VweyCqENVy9WiaFG7HR2lcw3Xj77X0iHMMZM-67sxAmcmSiX4xCsHZ2i-zisYdbxyqAnxqZmOCYa_844Dv-4zhdAKfNWQ0bqP5ijOTEA/s1600/no-thumb.png"}var h=n.published.$t,f=h.substring(0,4),w=h.substring(5,7),v=h.substring(8,10),A=new Array;A[1]="Jan",A[2]="Feb",A[3]="Mar",A[4]="Apr",A[5]="May",A[6]="Jun",A[7]="Jul",A[8]="Aug",A[9]="Sep",A[10]="Oct",A[11]="Nov",A[12]="Dec",document.write('<li class="recent-posts-list">'),1==posts_date&&document.write('<div class="post-date">'+A[parseInt(w,10)]+" "+v+" "+f+"</div>"),1==showpoststhumbs&&document.write('<a href="'+r+'"><img class="recent-post-thumb" src="'+u+'"/></a>'),document.write('<div class="recent-post-title"><a href="'+r+'" target ="_top">'+i+"</a></div>");var g="",k=0;document.write('<div class="recent-posts-details">'),1==showcommentslink&&(1==k&&(g+=" <br> "),"1 Comments"==l&&(l="1 Comment"),"0 Comments"==l&&(l="No Comments"),l='<a href="'+m+'" target ="_top">'+l+"</a>",g+=l,k=1),1==readmorelink&&(1==k&&(g+=" | "),g=g+'<a class="readmorelink" href="'+r+'" class="url" target ="_top">Read more</a>',k=1),document.write(g),document.write("</div>"),document.write("</li>")}document.write("</ul>")}
</script>
<script type="text/javascript">
var posts_no = 5;
var showpoststhumbs = true;
var readmorelink = true;
var showcommentslink = true;
var posts_date = true;
</script>
<script src="/feeds/posts/default?orderby=published&alt=json-in-script&callback=showlatestpostswiththumbs" rel="nofollow"></script>
<a style="font-size: 9px; color: #CECECE; float: right; margin-top: 5px;" href="http://helplogger.blogspot.com/2014/11/5-cool-recent-post-widgets-for-blogger.html" rel="nofollow">Recent Posts Widget</a>
<noscript>Your browser does not support JavaScript!</noscript>
<link href='http://fonts.googleapis.com/css?family=Lobster|Gloria+Hallelujah' rel='stylesheet' type='text/css' />
<style type="text/css">
img.recent-post-thumb {width:50px;height:50px;float:right;margin: -4px -35px 0px 0px; border: 4px solid #FCD6CB; border-radius: 100%;}
.recent-posts-container {font-family: 'Gloria Hallelujah', cursive;  float: left;width: 100%;min-height: 55px;margin: 5px 0px 5px 0px;padding: 0;font-size:12px;}
ul.recent-posts-container {counter-reset: countposts;list-style-type: none; background: #fff; }
ul.recent-posts-container li:before {content: counter(countposts,decimal);counter-increment: countposts;z-index: 2;position:absolute; left: -20px; font-size: 16px;color: #616662;background: #FCD6CB;padding: 9px 14px; border-radius: 100%; margin-top: 15px;}
ul.recent-posts-container li {padding:5px 0px;min-height:50px; list-style-type: none; margin: -2px 5px 5px 5px;  border-top: 2px solid #FCD6CB;}
ul.recent-posts-container {border: 2px solid #FCD6CB; }
.recent-posts-container a { text-decoration:none; }
.recent-posts-container a:hover { color: #222;}
.post-date {color:#e0c0c6; font-size: 11px; }
.recent-post-title a {font-size: 14px;color: #616662;}
.recent-post-title {padding: 6px 0px;}
.recent-posts-details a{ color: #888;}
.recent-posts-details {padding-bottom: 5px;}
a.readmorelink {color: #4DACE3;}
</style>

How to Add Recent Posts Widget on Blogger

Want to add one of the styles above? Just follow the following steps below:
  1. Log into your Blogger dashboard and click on your blog.
  2. Go to "Layout" and click the "Add a gadget" link on the right side.
  3. From the pop-up window, scroll down and select the "HTML/JavaScript" gadget:

  4. Paste the code of the chosen widget found below it.
  5. Hit the "Save" button and you're done!

Keep Your Blog Updated

Using a recent post widget for Blogger can truly benefit you and improve your skill as a blogger. As you can see, these designs can look great on Blogger sites, but they do act a little bit like a progress report for the author. If you start to fall behind, the dates on your recent post widget will definitely give you away.

Set a schedule and make sure that you are making regular posts on the blog. These posts will be automatically updated on your widget and readers can view this information whenever they want. Add your recent post widget for Blogger on the every page of the blog or in your template so that these posts can encourage others to continue reading, thus increasing the total time spent on your site.

5 Cool Recent Post Widgets for Blogger

For bloggers that pride themselves on always staying up-to-date with new content, a recent post widget for Blogger can be an invaluable tool. A recent posts widget for blogger is in many ways similar to a 'breaking news alert' that journalists love to use during their reports, providing the most recent and relevant posts that you have to offer.

recent posts for blogger
Adding a recent post widget for Blogger helps to reduce the dependency on email marketing, because you don't have to send out an email just to let people know you made a new post. Instead, it updates automatically for everyone to see. You can then use this information to design scheduled email newsletters, and take advantage of what's often referred to as the 'Twitter effect' where audiences will regularly check back on your site for the possibility that new posts are available. Without this, you force people to do run their own search for information and content, increasing the likelihood that they'll leave the site and hurt your bounce rate.

blogger recent posts widgets

Once you've managed to attract visitors to one of your posts using the recent post widget for Blogger, it will continue to act as an accessible secondary resource to navigate around your site. That way, you can avoid having them sifting through old content that might be outdated. If you'd rather show off some of your best posts instead of your most recent posts, you can do that instead, or add that feature to the bar with just a few alterations.

Apart from looking great and taking up minimal space, there are too many benefits for you not to have a recent post widget for Blogger. The best part about these add-ons is that they come in a wide variety of designs that will fit any theme.


If you're interested in adding a widget to your site, here are 5 cool recent post widgets that might catch your eye and fit perfectly with your Blogger template:

Recent Posts Style #1

rainbow widget, recent posts
<script type="text/javascript">
function showlatestpostswiththumbs(t){document.write('<ul class="recent-posts-container">');for(var e=0;e<posts_no;e++){var r,n=t.feed.entry[e],i=n.title.$t;if(e==t.feed.entry.length)break;for(var o=0;o<n.link.length;o++){if("replies"==n.link[o].rel&&"text/html"==n.link[o].type)var l=n.link[o].title,m=n.link[o].href;if("alternate"==n.link[o].rel){r=n.link[o].href;break}}var u;try{u=n.media$thumbnail.url}catch(h){s=n.content.$t,a=s.indexOf("<img"),b=s.indexOf('src="',a),c=s.indexOf('"',b+5),d=s.substr(b+5,c-b-5),u=-1!=a&&-1!=b&&-1!=c&&""!=d?d:"https://blogger.googleusercontent.com/img/b/R29vZ2xl/AVvXsEgmUq0knxuz4Rz7cpfk_8qJEEvjv0xhMp5kMxQ9VweyCqENVy9WiaFG7HR2lcw3Xj77X0iHMMZM-67sxAmcmSiX4xCsHZ2i-zisYdbxyqAnxqZmOCYa_844Dv-4zhdAKfNWQ0bqP5ijOTEA/s1600/no-thumb.png"}var p=n.published.$t,f=p.substring(0,4),g=p.substring(5,7),v=p.substring(8,10),w=new Array;if(w[1]="Jan",w[2]="Feb",w[3]="Mar",w[4]="Apr",w[5]="May",w[6]="Jun",w[7]="Jul",w[8]="Aug",w[9]="Sep",w[10]="Oct",w[11]="Nov",w[12]="Dec",document.write('<li class="recent-posts-list">'),1==showpoststhumbs&&document.write('<a href="'+r+'"><img class="recent-post-thumb" src="'+u+'"/></a>'),document.write('<div class="recent-post-title"><a href="'+r+'" target ="_top">'+i+"</a></div>"),"content"in n)var A=n.content.$t;else if("summary"in n)var A=n.summary.$t;else var A="";var k=/<\S[^>]*>/g;if(A=A.replace(k,""),1==post_summary)if(A.length<summary_chars)document.write(A);else{A=A.substring(0,summary_chars);var y=A.lastIndexOf(" ");A=A.substring(0,y),document.write(A+"...")}var _="",$=0;document.write('<br><div class="recent-posts-details">'),1==posts_date&&(_=_+w[parseInt(g,10)]+" "+v+" "+f,$=1),1==readmorelink&&(1==$&&(_+=" | "),_=_+'<a href="'+r+'" class="url" target ="_top">Read more</a>',$=1),1==showcommentslink&&(1==$&&(_+=" <br> "),"1 Comments"==l&&(l="1 Comment"),"0 Comments"==l&&(l="No Comments"),l='<a href="'+m+'" target ="_top">'+l+"</a>",_+=l,$=1),document.write(_),document.write("</div>"),document.write("</li>")}document.write("</ul>")}
</script>
<script type="text/javascript">
var posts_no = 5;
var showpoststhumbs = true;
var readmorelink = true;
var showcommentslink = false;
var posts_date = true;
var post_summary = true;
var summary_chars = 70;
</script>
<script src="/feeds/posts/default?orderby=published&alt=json-in-script&callback=showlatestpostswiththumbs"></script>
<a style="font-size: 9px; color: #CECECE; margin-top: 10px;" href="http://helplogger.blogspot.com/2014/11/5-cool-recent-post-widgets-for-blogger.html" rel="nofollow">Recent Posts Widget</a>

<noscript>Your browser does not support JavaScript!</noscript>
<link href='http://fonts.googleapis.com/css?family=Ubuntu+Condensed' rel='stylesheet' type='text/css' />
<style type="text/css">
img.recent-post-thumb{width:50px;height:50px;float:right;margin:5px -5px 0px 0px;-webkit-border-radius:50%;-moz-border-radius:50%;border-radius:50%;padding:3px;background: #fff}
ul.recent-posts-container {list-style-type: none; background: #fff;padding: 0px;font:12px 'Ubuntu Condensed', sans-serif;margin: 5px 0px 5px 0px;}
ul.recent-posts-container li:nth-child(1n+0) {background: #F49A9A; width: 100%}
ul.recent-posts-container li:nth-child(2n+0) {background: #FCD092; width: 95%}
ul.recent-posts-container li:nth-child(3n+0) {background: #FFF59E; width: 90%;}
ul.recent-posts-container li:nth-child(4n+0) {background: #E1EFA0; width: 85%;}
ul.recent-posts-container li:nth-child(5n+0) {background: #B1DAEF; width: 80%;}
ul.recent-posts-container li {padding:5px 10px;list-style-type: none; margin: 0 0 -5px; color: #777;}
.recent-posts-container a { text-decoration:none; }
.recent-posts-container a:hover { color: #222;}
.post-date {color:#e0c0c6; font-size: 11px; }
.recent-post-title a {font-size: 14px;color: #444; font-weight: bold;}
.recent-post-title {padding: 6px 0px;}
.recent-posts-details a{ color: #222;}
.recent-posts-details {padding: 5px 0px 5px; }
</style>

Recent Posts Style #2

recent posts widget for blogger
<div class="recentpoststyle">
<script type="text/javascript">
function showlatestposts(e){for(var t=0;t<posts_no;t++){var r,s=e.feed.entry[t],n=s.title.$t;if(t==e.feed.entry.length)break;for(var a=0;a<s.link.length;a++)if("alternate"==s.link[a].rel){r=s.link[a].href;break}n=n.link(r);var i="... read more";i=i.link(r);var l=s.published.$t,o=l.substring(0,4),u=l.substring(5,7),c=l.substring(8,10),m=new Array;if(m[1]="Jan",m[2]="Feb",m[3]="Mar",m[4]="Apr",m[5]="May",m[6]="Jun",m[7]="Jul",m[8]="Aug",m[9]="Sep",m[10]="Oct",m[11]="Nov",m[12]="Dec","content"in s)var d=s.content.$t;else if("summary"in s)var d=s.summary.$t;else var d="";var v=/<\S[^>]*>/g;if(d=d.replace(v,""),document.write('<li class="recent-post-title">'),document.write(n),document.write('</li><div class="recent-post-summ">'),1==post_summary)if(d.length<summary_chars)document.write(d);else{d=d.substring(0,summary_chars);var f=d.lastIndexOf(" ");d=d.substring(0,f),document.write(d+" "+i)}document.write("</div>"),1==posts_date&&document.write('<div class="post-date">'+m[parseInt(u,10)]+" "+c+" "+o+"</div>")}}
</script>
<script type="text/javascript">
var posts_no = 5;var posts_date = true;var post_summary = true;var summary_chars = 80;</script>
<script src="/feeds/posts/default?orderby=published&amp;alt=json-in-script&amp;callback=showlatestposts">
</script><a style="font-size: 9px; color: #CECECE;margin-top:10px;" href="http://helplogger.blogspot.com/2014/11/5-cool-recent-post-widgets-for-blogger.html" rel="nofollow">Recent Posts Widget</a>
<noscript>Your browser does not support JavaScript!</noscript>
<style type="text/css">
.recentpoststyle {counter-reset: countposts;list-style-type: none;}
.recentpoststyle a {text-decoration: none;color: #49A8D1;}
.recentpoststyle a:hover {color: #000;}
.recentpoststyle li:before {content: counter(countposts,decimal);counter-increment: countposts;float: left;z-index: 1;position:relative;font-size: 15px;font-weight: bold;color:#fff;background:#69B7E2; margin:13px 5px 0px -6px;line-height:30px;width:30px;height:30px;text-align:center;-webkit-border-radius:50%;-moz-border-radius:50%;border-radius:50%;}li.recent-post-title{margin-bottom: 5px;padding: 0;}
.recent-post-title a {color: #444;text-decoration: none;font: bold 13px "Avant Garde",Avantgarde,"Century Gothic",CenturyGothic,AppleGothic,sans-serif;}
.post-date {font-size: 11px;color: #999;margin:5px 0px 15px 32px;}
.recent-post-summ {border-left:1px solid #69B7E2; color: #777; padding: 0px 5px 0px 20px; margin-left: 10px; font: 15px Garamond,Baskerville,"Baskerville Old Face","Hoefler Text","Times New Roman",serif;}
</style></div>

Recent Posts Style #3

recent posts gadget

<script type="text/javascript">
function showlatestpostswiththumbs(t){document.write('<ul class="recent-posts-container">');for(var e=0;e<posts_no;e++){var r,n=t.feed.entry[e],i=n.title.$t;if(e==t.feed.entry.length)break;for(var o=0;o<n.link.length;o++){if("replies"==n.link[o].rel&&"text/html"==n.link[o].type)var l=n.link[o].title,m=n.link[o].href;if("alternate"==n.link[o].rel){r=n.link[o].href;break}}var u;try{u=n.media$thumbnail.url}catch(h){s=n.content.$t,a=s.indexOf("<img"),b=s.indexOf('src="',a),c=s.indexOf('"',b+5),d=s.substr(b+5,c-b-5),u=-1!=a&&-1!=b&&-1!=c&&""!=d?d:"https://blogger.googleusercontent.com/img/b/R29vZ2xl/AVvXsEgmUq0knxuz4Rz7cpfk_8qJEEvjv0xhMp5kMxQ9VweyCqENVy9WiaFG7HR2lcw3Xj77X0iHMMZM-67sxAmcmSiX4xCsHZ2i-zisYdbxyqAnxqZmOCYa_844Dv-4zhdAKfNWQ0bqP5ijOTEA/s1600/no-thumb.png"}var p=n.published.$t,f=p.substring(0,4),g=p.substring(5,7),v=p.substring(8,10),w=new Array;if(w[1]="Jan",w[2]="Feb",w[3]="Mar",w[4]="Apr",w[5]="May",w[6]="Jun",w[7]="Jul",w[8]="Aug",w[9]="Sep",w[10]="Oct",w[11]="Nov",w[12]="Dec",document.write('<li class="recent-posts-list">'),1==showpoststhumbs&&document.write('<a href="'+r+'"><img class="recent-post-thumb" src="'+u+'"/></a>'),document.write('<div class="recent-post-title"><a href="'+r+'" target ="_top">'+i+"</a></div>"),"content"in n)var A=n.content.$t;else if("summary"in n)var A=n.summary.$t;else var A="";var k=/<\S[^>]*>/g;if(A=A.replace(k,""),1==post_summary)if(A.length<summary_chars)document.write(A);else{A=A.substring(0,summary_chars);var y=A.lastIndexOf(" ");A=A.substring(0,y),document.write(A+"...")}var _="",$=0;document.write('<br><div class="recent-posts-details">'),1==posts_date&&(_=_+w[parseInt(g,10)]+" "+v+" "+f,$=1),1==readmorelink&&(1==$&&(_+=" | "),_=_+'<a href="'+r+'" class="url" target ="_top">Read more</a>',$=1),1==showcommentslink&&(1==$&&(_+=" <br> "),"1 Comments"==l&&(l="1 Comment"),"0 Comments"==l&&(l="No Comments"),l='<a href="'+m+'" target ="_top">'+l+"</a>",_+=l,$=1),document.write(_),document.write("</div>"),document.write("</li>")}document.write("</ul>")}
</script>
<script type="text/javascript">
var posts_no = 5;
var showpoststhumbs = true;
var readmorelink = true;
var showcommentslink = true;
var posts_date = true;
var post_summary = true;
var summary_chars = 40;</script>
<script src="/feeds/posts/default?orderby=published&alt=json-in-script&callback=showlatestpostswiththumbs"></script>
<a style="font-size: 9px; color: #CECECE; margin-top: 10px;" href="http://helplogger.blogspot.com/2014/11/5-cool-recent-post-widgets-for-blogger.html" rel="nofollow">Recent Posts Widget</a>

<noscript>Your browser does not support JavaScript!</noscript>

<link href='http://fonts.googleapis.com/css?family=Oswald' rel='stylesheet' type='text/css'/>
<style type="text/css">
img.recent-post-thumb{padding:2px;width:65px;height:65px;float:left;margin:0px 10px 10px;border: 1px solid #69B7E2;}
.recent-posts-container {font-family:'Oswald', sans-serif;font-size:12px;}
ul.recent-posts-container li{list-style-type: none; margin-bottom: 10px;font-size:12px;float:left;width:100%}
ul.recent-posts-container {counter-reset: countposts;list-style-type:none;padding:0;}
ul.recent-posts-container li:before {content: counter(countposts,decimal);counter-increment: countposts;z-index: 1;position:absolute; left: 0px; font-size: 13px;font-weight: bold;color: #fff;background: #69B7E2;line-height:25px;height:25px;width:25px;text-align:center;-webkit-border-radius: 50%;-moz-border-radius: 50%;border-radius: 50%;}
.recent-posts-container a{text-decoration:none;}
.recent-post-title {margin-bottom:5px;}
.recent-post-title a {font-size:12px; text-transform: uppercase; color: #2aace3;}
.recent-posts-details {margin: 5px 0px 0px 92px;font-size:11px;}
.recent-posts-details a{color: #777;}
</style>

Recent Posts Style #4

recent posts for blogger, cool widgets
<script type="text/javascript">
function showlatestpostswiththumbs(t){document.write('<ul class="recent-posts-container">');for(var e=0;e<posts_no;e++){var r,n=t.feed.entry[e],i=n.title.$t;if(e==t.feed.entry.length)break;for(var o=0;o<n.link.length;o++){if("replies"==n.link[o].rel&&"text/html"==n.link[o].type)var l=n.link[o].title,m=n.link[o].href;if("alternate"==n.link[o].rel){r=n.link[o].href;break}}var u;try{u=n.media$thumbnail.url}catch(p){s=n.content.$t,a=s.indexOf("<img"),b=s.indexOf('src="',a),c=s.indexOf('"',b+5),d=s.substr(b+5,c-b-5),u=-1!=a&&-1!=b&&-1!=c&&""!=d?d:"https://blogger.googleusercontent.com/img/b/R29vZ2xl/AVvXsEgmUq0knxuz4Rz7cpfk_8qJEEvjv0xhMp5kMxQ9VweyCqENVy9WiaFG7HR2lcw3Xj77X0iHMMZM-67sxAmcmSiX4xCsHZ2i-zisYdbxyqAnxqZmOCYa_844Dv-4zhdAKfNWQ0bqP5ijOTEA/s1600/no-thumb.png"}var h=n.published.$t,f=h.substring(0,4),w=h.substring(5,7),v=h.substring(8,10),A=new Array;A[1]="Jan",A[2]="Feb",A[3]="Mar",A[4]="Apr",A[5]="May",A[6]="Jun",A[7]="Jul",A[8]="Aug",A[9]="Sep",A[10]="Oct",A[11]="Nov",A[12]="Dec",document.write('<li class="recent-posts-list">'),1==posts_date&&document.write('<div class="post-date">'+A[parseInt(w,10)]+" "+v+" "+f+"</div>"),1==showpoststhumbs&&document.write('<a href="'+r+'"><img class="recent-post-thumb" src="'+u+'"/></a>'),document.write('<div class="recent-post-title"><a href="'+r+'" target ="_top">'+i+"</a></div>");var g="",k=0;document.write('<div class="recent-posts-details">'),1==showcommentslink&&(1==k&&(g+=" <br> "),"1 Comments"==l&&(l="1 Comment"),"0 Comments"==l&&(l="No Comments"),l='<a href="'+m+'" target ="_top">'+l+"</a>",g+=l,k=1),1==readmorelink&&(1==k&&(g+=" | "),g=g+'<a class="readmorelink" href="'+r+'" class="url" target ="_top">Read more</a>',k=1),document.write(g),document.write("</div>"),document.write("</li>")}document.write("</ul>")}
</script>
<script type="text/javascript">
var posts_no = 5;
var showpoststhumbs = false;
var readmorelink = true;
var showcommentslink = true;
var posts_date = true;
</script>
<script src="/feeds/posts/default?orderby=published&alt=json-in-script&callback=showlatestpostswiththumbs"></script>
<a style="font-size: 9px; color: #CECECE; float: right; margin-top: 5px;" href="http://helplogger.blogspot.com/2014/11/5-cool-recent-post-widgets-for-blogger.html">Recent Posts Widget</a>
<noscript>Your browser does not support JavaScript!</noscript>
<link href='http://fonts.googleapis.com/css?family=Oswald' rel='stylesheet' type='text/css'/>
<style type="text/css">
img.recent-post-thumb {padding: 2px; width:35px;height:35px;float:right;margin: -14px 0px 0px 5px; border: 1px solid #cea5ac; border-radius: 10%;}
.recent-posts-container {font-family: 'Oswald', sans-serif;  float: left;width: 100%;min-height: 70px;margin: 5px 0px 5px 0px;padding: 0;font-size:12px;}
ul.recent-posts-container li {padding:5px 0px;min-height:65px; list-style-type: none; margin: 0px 10px 5px 35px;}
ul.recent-posts-container {counter-reset: countposts;list-style-type: none;}
ul.recent-posts-container li:before {content: counter(countposts,decimal);counter-increment: countposts;z-index: 2;position:absolute; left: 5px; font-size: 16px;color: #4D4D4D;background: #F7F7F7;padding: 9px 14px; border: 1px solid #efefef;}
.recent-posts-container a { text-decoration:none; }
.recent-posts-container a:hover{color: #4DACE3;}
.post-date {color:#e0c0c6; font-size: 11px; }
.recent-post-title a {font-size: 13px; text-transform: uppercase; color: #5C4D4D;}
.recent-post-title { margin: 5px 0px; }
.recent-posts-details {border-top: 4px solid #AC707A; margin-top: 5px; padding-top: 5px;}
.recent-posts-details a{ color: #888;}
a.readmorelink {color: #4DACE3;}
</style>

Recent Post Style #5

recent posts, blogger gadget
<script type="text/javascript">
function showlatestpostswiththumbs(t){document.write('<ul class="recent-posts-container">');for(var e=0;e<posts_no;e++){var r,n=t.feed.entry[e],i=n.title.$t;if(e==t.feed.entry.length)break;for(var o=0;o<n.link.length;o++){if("replies"==n.link[o].rel&&"text/html"==n.link[o].type)var l=n.link[o].title,m=n.link[o].href;if("alternate"==n.link[o].rel){r=n.link[o].href;break}}var u;try{u=n.media$thumbnail.url}catch(p){s=n.content.$t,a=s.indexOf("<img"),b=s.indexOf('src="',a),c=s.indexOf('"',b+5),d=s.substr(b+5,c-b-5),u=-1!=a&&-1!=b&&-1!=c&&""!=d?d:"https://blogger.googleusercontent.com/img/b/R29vZ2xl/AVvXsEgmUq0knxuz4Rz7cpfk_8qJEEvjv0xhMp5kMxQ9VweyCqENVy9WiaFG7HR2lcw3Xj77X0iHMMZM-67sxAmcmSiX4xCsHZ2i-zisYdbxyqAnxqZmOCYa_844Dv-4zhdAKfNWQ0bqP5ijOTEA/s1600/no-thumb.png"}var h=n.published.$t,f=h.substring(0,4),w=h.substring(5,7),v=h.substring(8,10),A=new Array;A[1]="Jan",A[2]="Feb",A[3]="Mar",A[4]="Apr",A[5]="May",A[6]="Jun",A[7]="Jul",A[8]="Aug",A[9]="Sep",A[10]="Oct",A[11]="Nov",A[12]="Dec",document.write('<li class="recent-posts-list">'),1==posts_date&&document.write('<div class="post-date">'+A[parseInt(w,10)]+" "+v+" "+f+"</div>"),1==showpoststhumbs&&document.write('<a href="'+r+'"><img class="recent-post-thumb" src="'+u+'"/></a>'),document.write('<div class="recent-post-title"><a href="'+r+'" target ="_top">'+i+"</a></div>");var g="",k=0;document.write('<div class="recent-posts-details">'),1==showcommentslink&&(1==k&&(g+=" <br> "),"1 Comments"==l&&(l="1 Comment"),"0 Comments"==l&&(l="No Comments"),l='<a href="'+m+'" target ="_top">'+l+"</a>",g+=l,k=1),1==readmorelink&&(1==k&&(g+=" | "),g=g+'<a class="readmorelink" href="'+r+'" class="url" target ="_top">Read more</a>',k=1),document.write(g),document.write("</div>"),document.write("</li>")}document.write("</ul>")}
</script>
<script type="text/javascript">
var posts_no = 5;
var showpoststhumbs = true;
var readmorelink = true;
var showcommentslink = true;
var posts_date = true;
</script>
<script src="/feeds/posts/default?orderby=published&alt=json-in-script&callback=showlatestpostswiththumbs" rel="nofollow"></script>
<a style="font-size: 9px; color: #CECECE; float: right; margin-top: 5px;" href="http://helplogger.blogspot.com/2014/11/5-cool-recent-post-widgets-for-blogger.html" rel="nofollow">Recent Posts Widget</a>
<noscript>Your browser does not support JavaScript!</noscript>
<link href='http://fonts.googleapis.com/css?family=Lobster|Gloria+Hallelujah' rel='stylesheet' type='text/css' />
<style type="text/css">
img.recent-post-thumb {width:50px;height:50px;float:right;margin: -4px -35px 0px 0px; border: 4px solid #FCD6CB; border-radius: 100%;}
.recent-posts-container {font-family: 'Gloria Hallelujah', cursive;  float: left;width: 100%;min-height: 55px;margin: 5px 0px 5px 0px;padding: 0;font-size:12px;}
ul.recent-posts-container {counter-reset: countposts;list-style-type: none; background: #fff; }
ul.recent-posts-container li:before {content: counter(countposts,decimal);counter-increment: countposts;z-index: 2;position:absolute; left: -20px; font-size: 16px;color: #616662;background: #FCD6CB;padding: 9px 14px; border-radius: 100%; margin-top: 15px;}
ul.recent-posts-container li {padding:5px 0px;min-height:50px; list-style-type: none; margin: -2px 5px 5px 5px;  border-top: 2px solid #FCD6CB;}
ul.recent-posts-container {border: 2px solid #FCD6CB; }
.recent-posts-container a { text-decoration:none; }
.recent-posts-container a:hover { color: #222;}
.post-date {color:#e0c0c6; font-size: 11px; }
.recent-post-title a {font-size: 14px;color: #616662;}
.recent-post-title {padding: 6px 0px;}
.recent-posts-details a{ color: #888;}
.recent-posts-details {padding-bottom: 5px;}
a.readmorelink {color: #4DACE3;}
</style>

How to Add Recent Posts Widget on Blogger

Want to add one of the styles above? Just follow the following steps below:
  1. Log into your Blogger dashboard and click on your blog.
  2. Go to "Layout" and click the "Add a gadget" link on the right side.
  3. From the pop-up window, scroll down and select the "HTML/JavaScript" gadget:

  4. Paste the code of the chosen widget found below it.
  5. Hit the "Save" button and you're done!

Keep Your Blog Updated

Using a recent post widget for Blogger can truly benefit you and improve your skill as a blogger. As you can see, these designs can look great on Blogger sites, but they do act a little bit like a progress report for the author. If you start to fall behind, the dates on your recent post widget will definitely give you away.

Set a schedule and make sure that you are making regular posts on the blog. These posts will be automatically updated on your widget and readers can view this information whenever they want. Add your recent post widget for Blogger on the every page of the blog or in your template so that these posts can encourage others to continue reading, thus increasing the total time spent on your site.

Posted at December 22, 2020 |  by Online Ustaad

0 comments:

© 2013 OU Free Video Tutorials. All rights reserved
back to top